
Super Admin Settings
The Super Admin Settings page provides system administrators with control over various aspects of the Tably platform. This documentation covers the different settings available to super admins and how to configure them.
SaaS Business Settings
The SaaS Business Settings allow administrators to customize the branding of the entire system. Changes made here will be reflected throughout the entire platform.
Business Name and Logo
SaaS buyers need to upload their logo and set their business name in this section. These settings will affect the branding throughout the entire system.
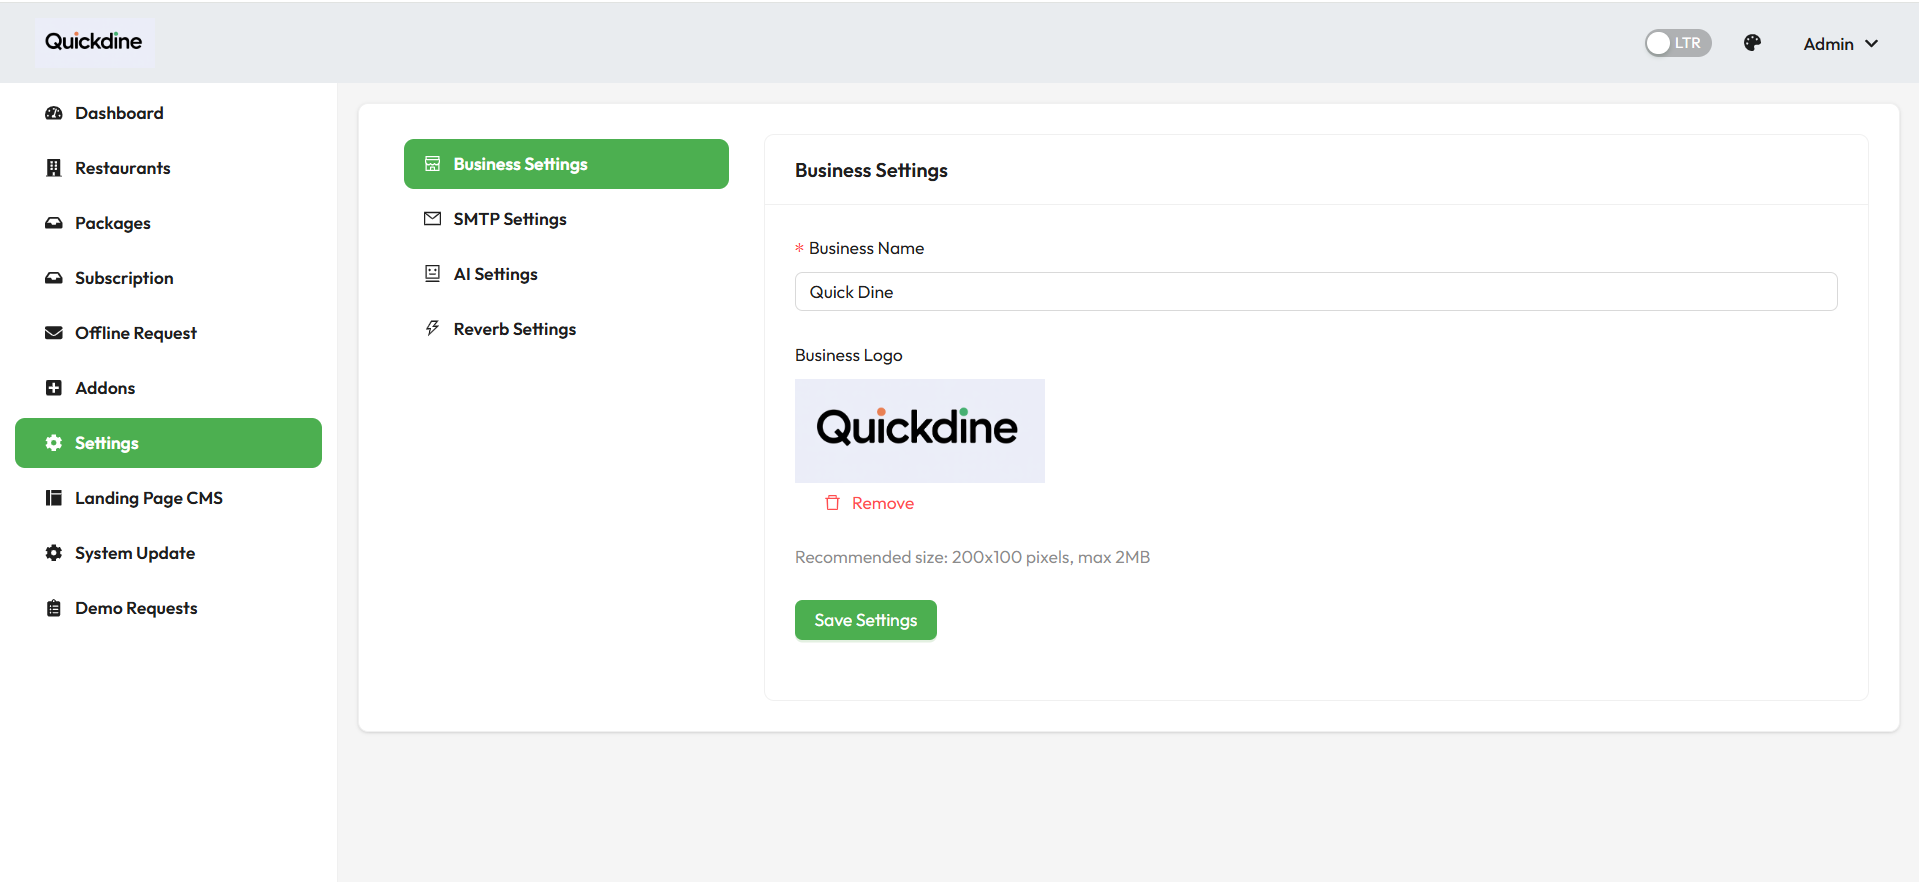
Note: It's recommended to use a logo with a transparent background in PNG format for the best appearance across different parts of the system.
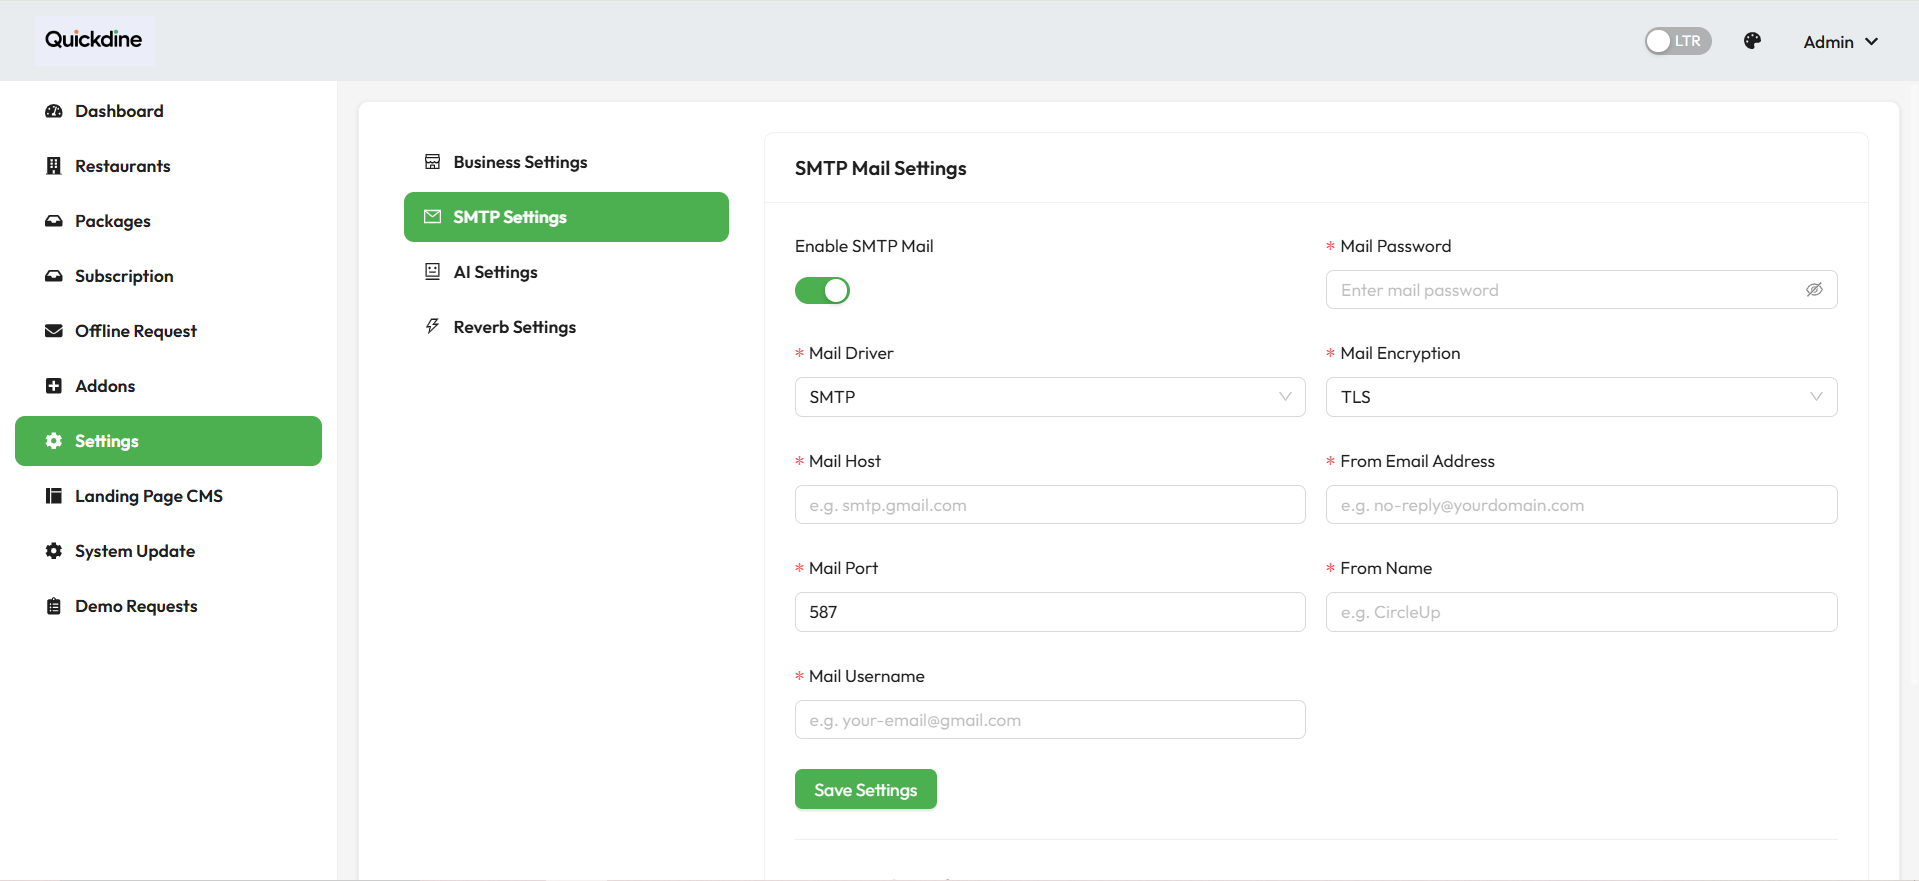
SMTP Settings
Configure the outgoing mail server that will be used for sending system emails, notifications, and password reset messages.
AI Settings
Configure AI integration settings for advanced features in the platform.
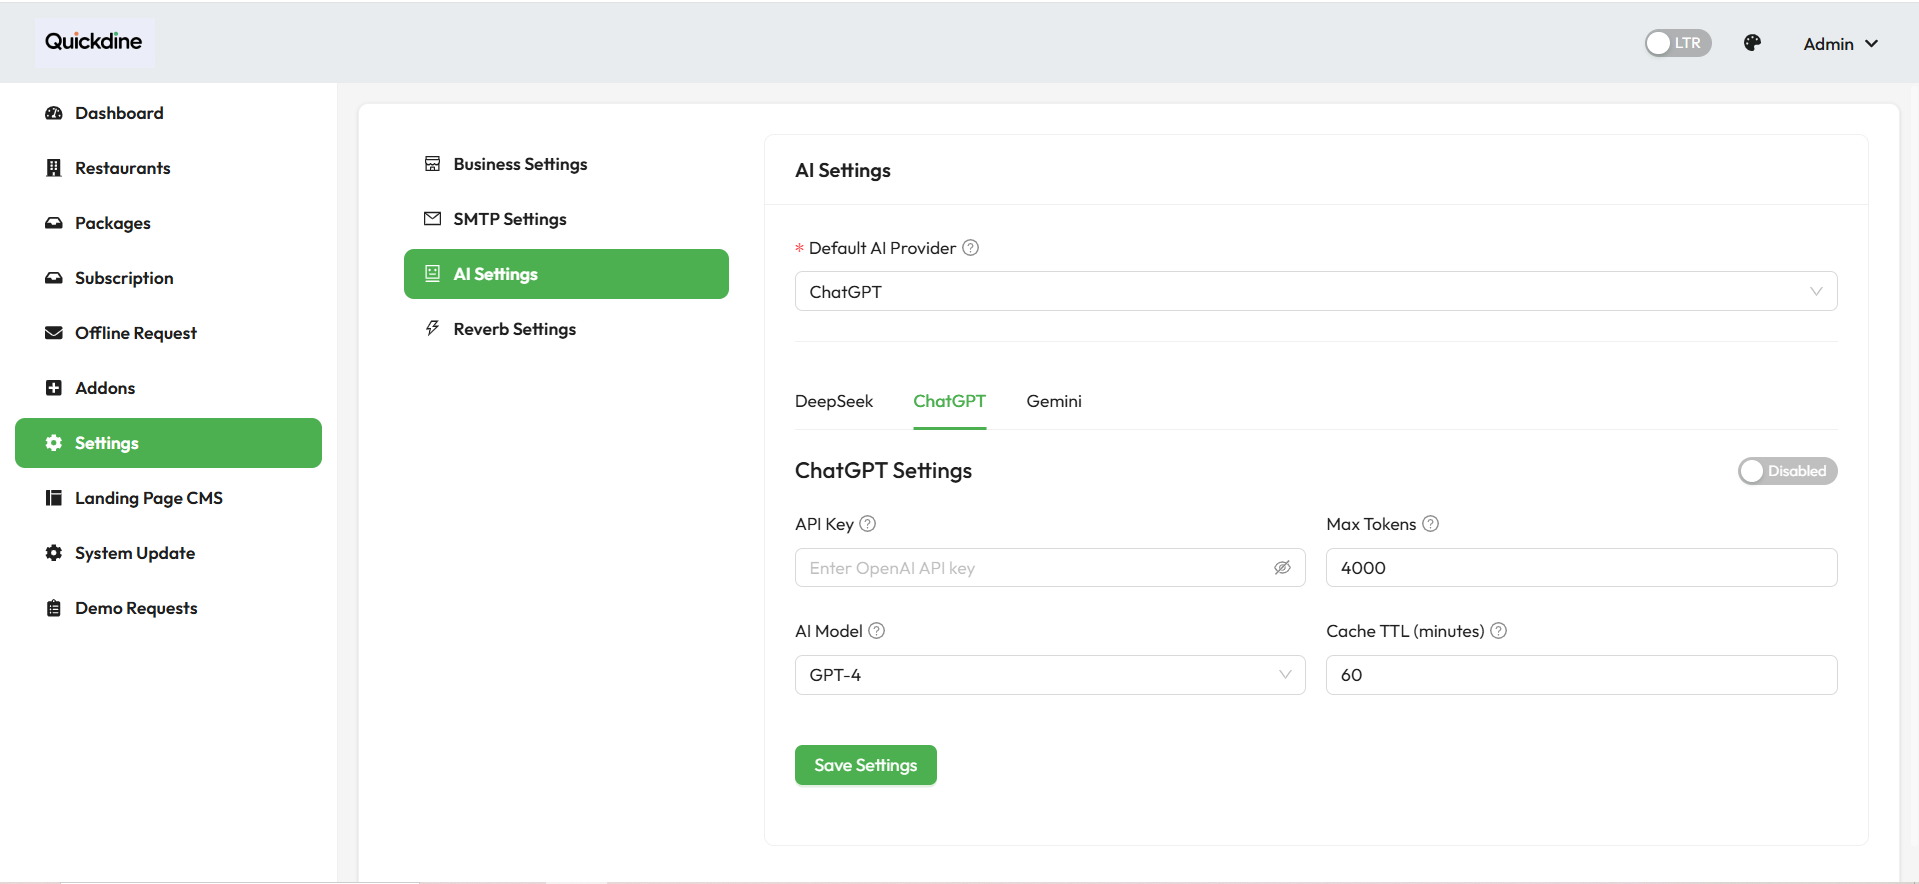
Note: AI features require valid API keys from supported AI service providers.
Reverb Settings
Reverb is Laravel's WebSocket server for real-time broadcasting features like notifications and live updates.
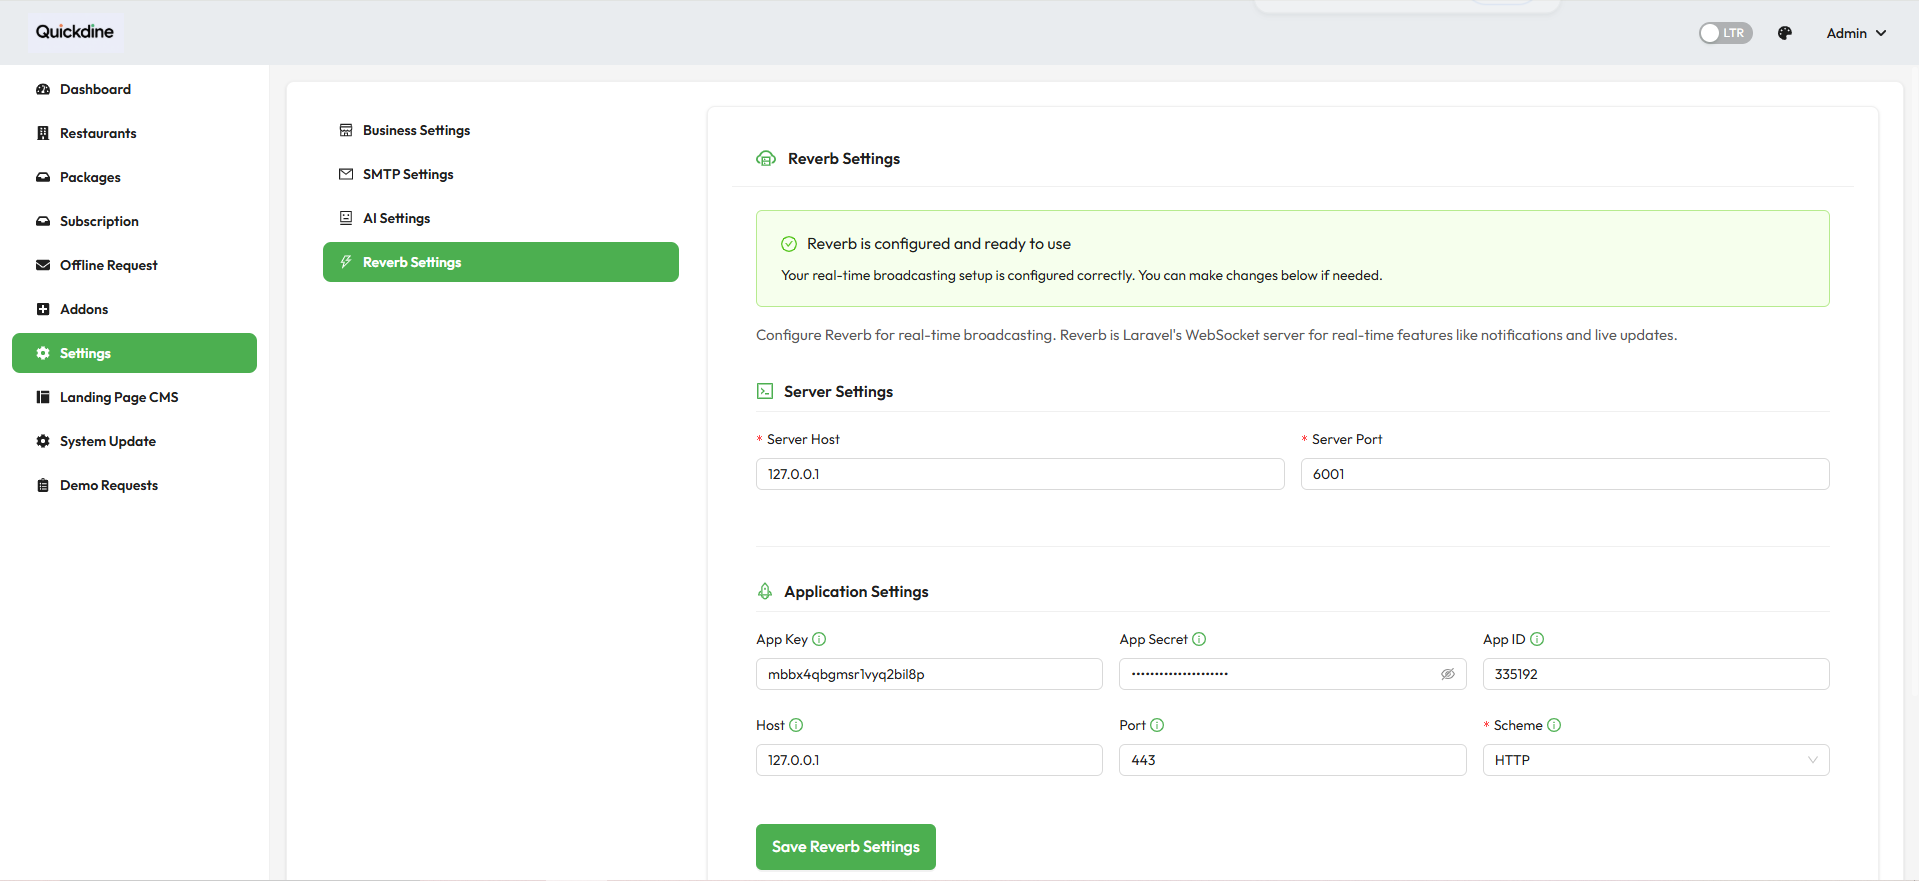
The Reverb settings page contains the following configuration options:
Server Settings
- Server Host: The host address for the WebSocket server (e.g., 127.0.0.1)
- Server Port: The port number for the WebSocket server (e.g., 6001)
Application Settings
- App Key: The application key for WebSocket authentication
- App Secret: The secret key for secure WebSocket connections
- App ID: The application identifier
- Host: The host address for client connections
- Port: The port number for client connections
- Scheme: The connection protocol (HTTP or HTTPS)
Note: Reverb settings are configured by default for local development. For production environments, you'll need to adjust these settings according to your server configuration.
Stripe Payment Gateway
Configure Stripe payment gateway settings to enable secure online payments through your platform.
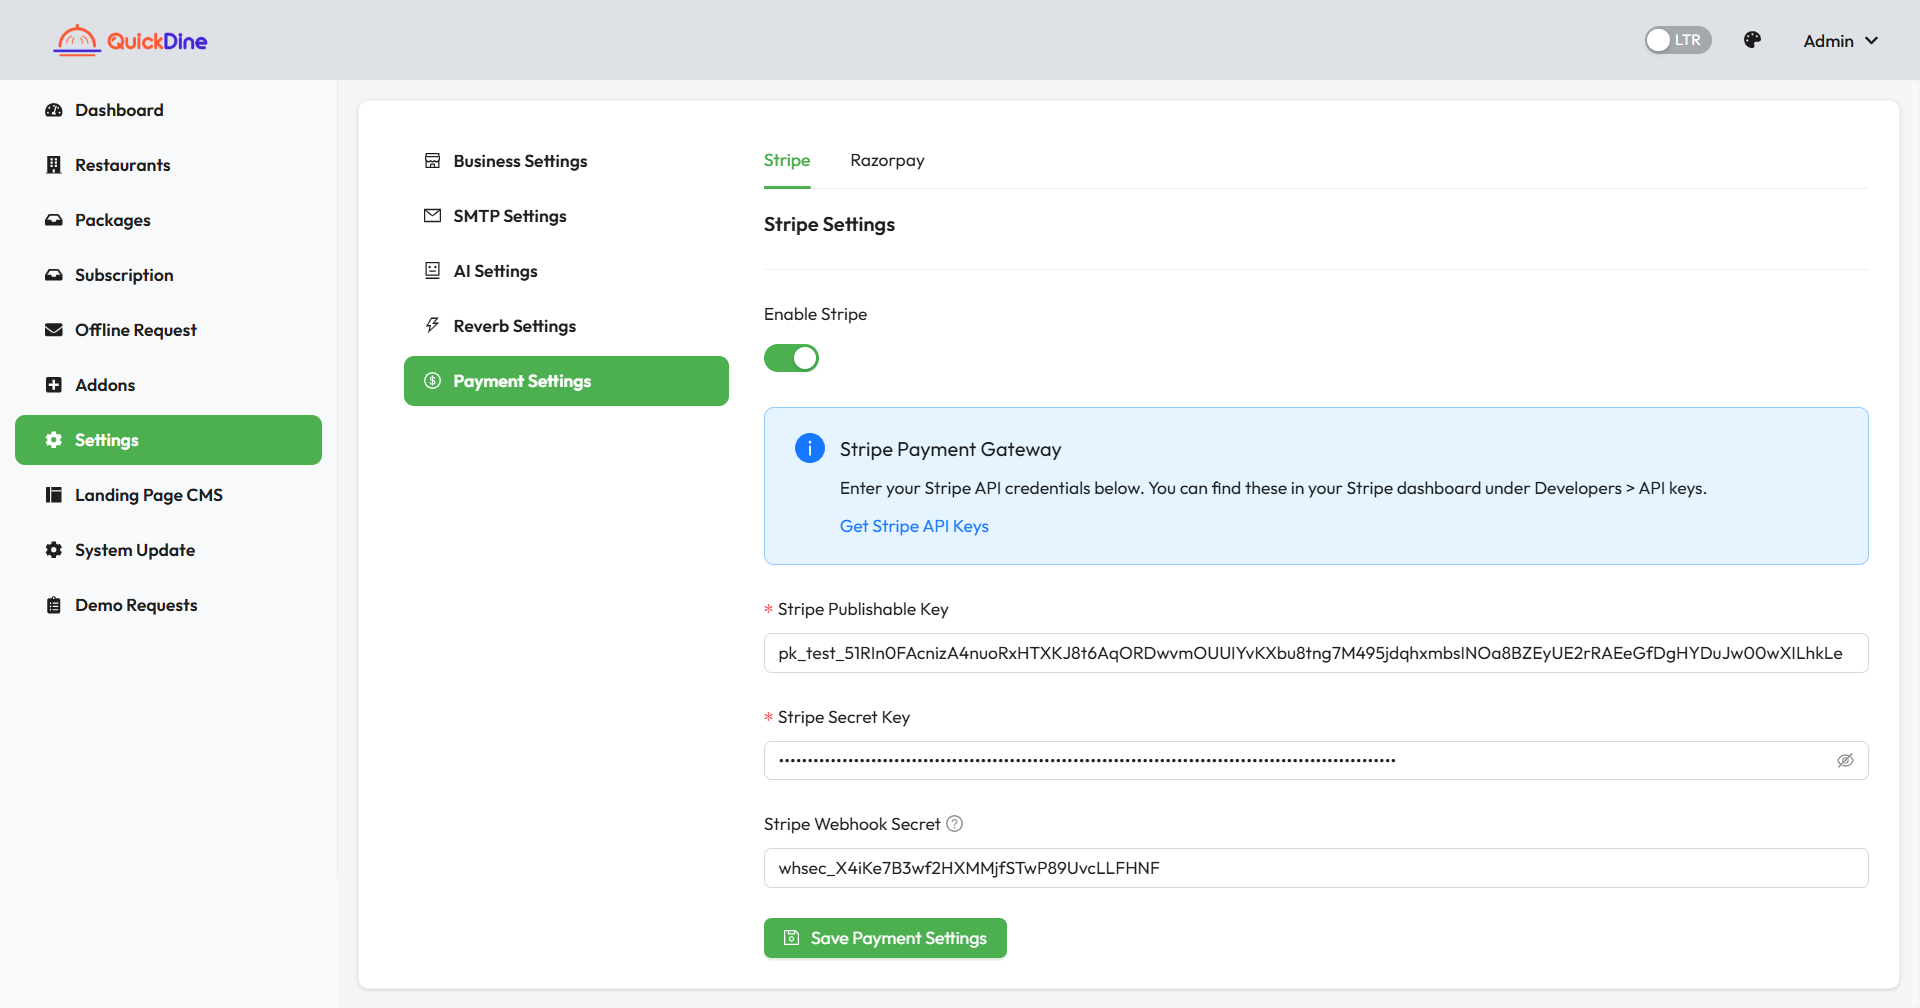
The Stripe payment gateway settings page includes the following configuration options:
API Credentials
- Publishable Key: Your Stripe API publishable key for client-side integration
- Secret Key: Your Stripe API secret key for server-side operations
- Webhook Secret: The secret key for verifying webhook events from Stripe
Payment Settings
Note: For testing purposes, use Stripe's test API keys. Switch to production API keys when your system is ready for real transactions.
Razorpay Payment Gateway
Configure Razorpay payment gateway settings to enable secure online payments through your platform, particularly for the Indian market.
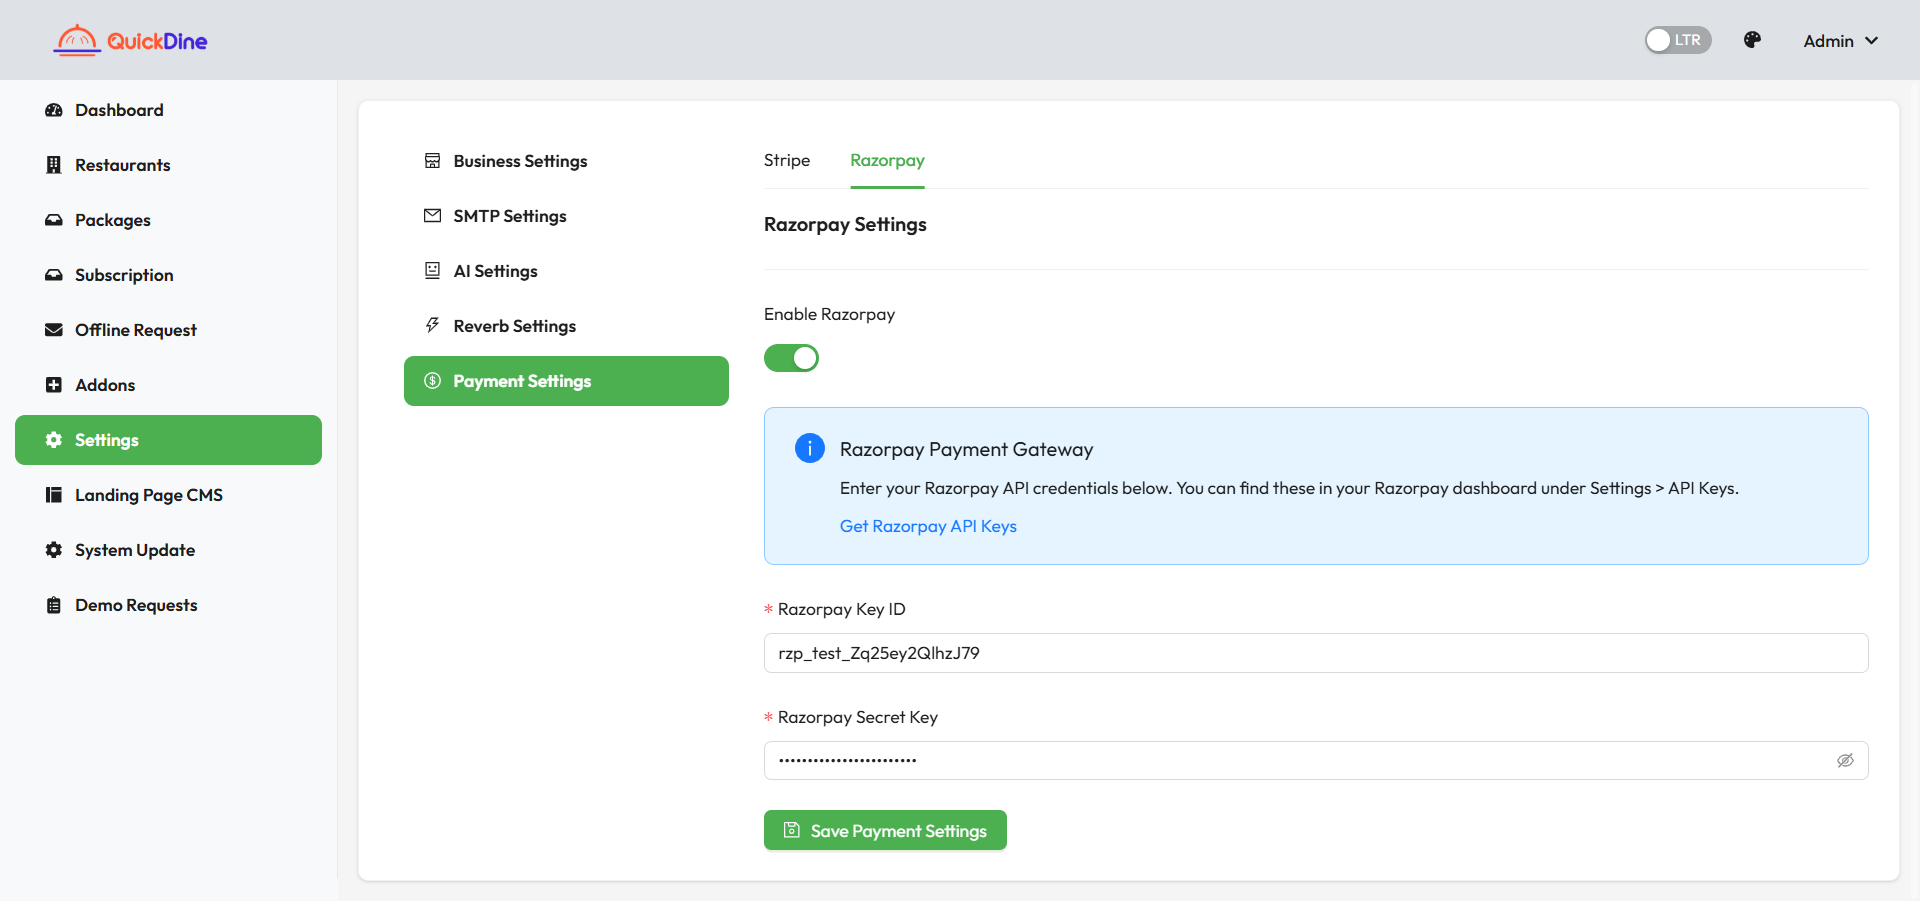
The Razorpay payment gateway settings page includes the following configuration options:
API Credentials
- Key ID: Your Razorpay API key ID for integration
- Key Secret: Your Razorpay API key secret for secure transactions
Note: Ensure you have a registered Razorpay account and have completed the necessary KYC requirements before going live with Razorpay payments.
Hero Section
The Hero Section is the first thing visitors see on your landing page. It sets the tone for your website and showcases your main value proposition.
Hero Section Configuration
Customize the headline, subtitle, and hero image to create a compelling first impression.
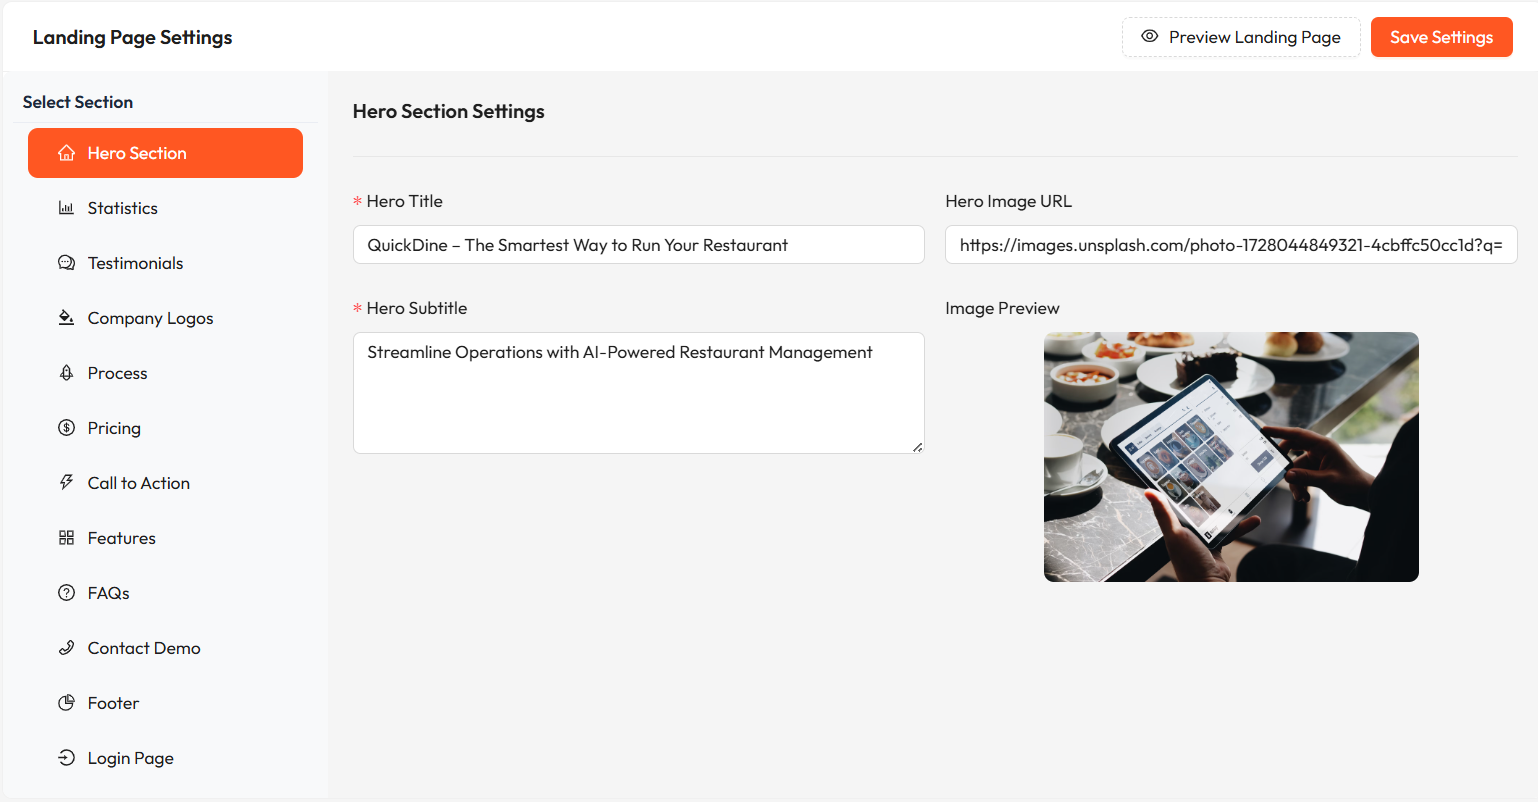
Hero Section Configuration Interface
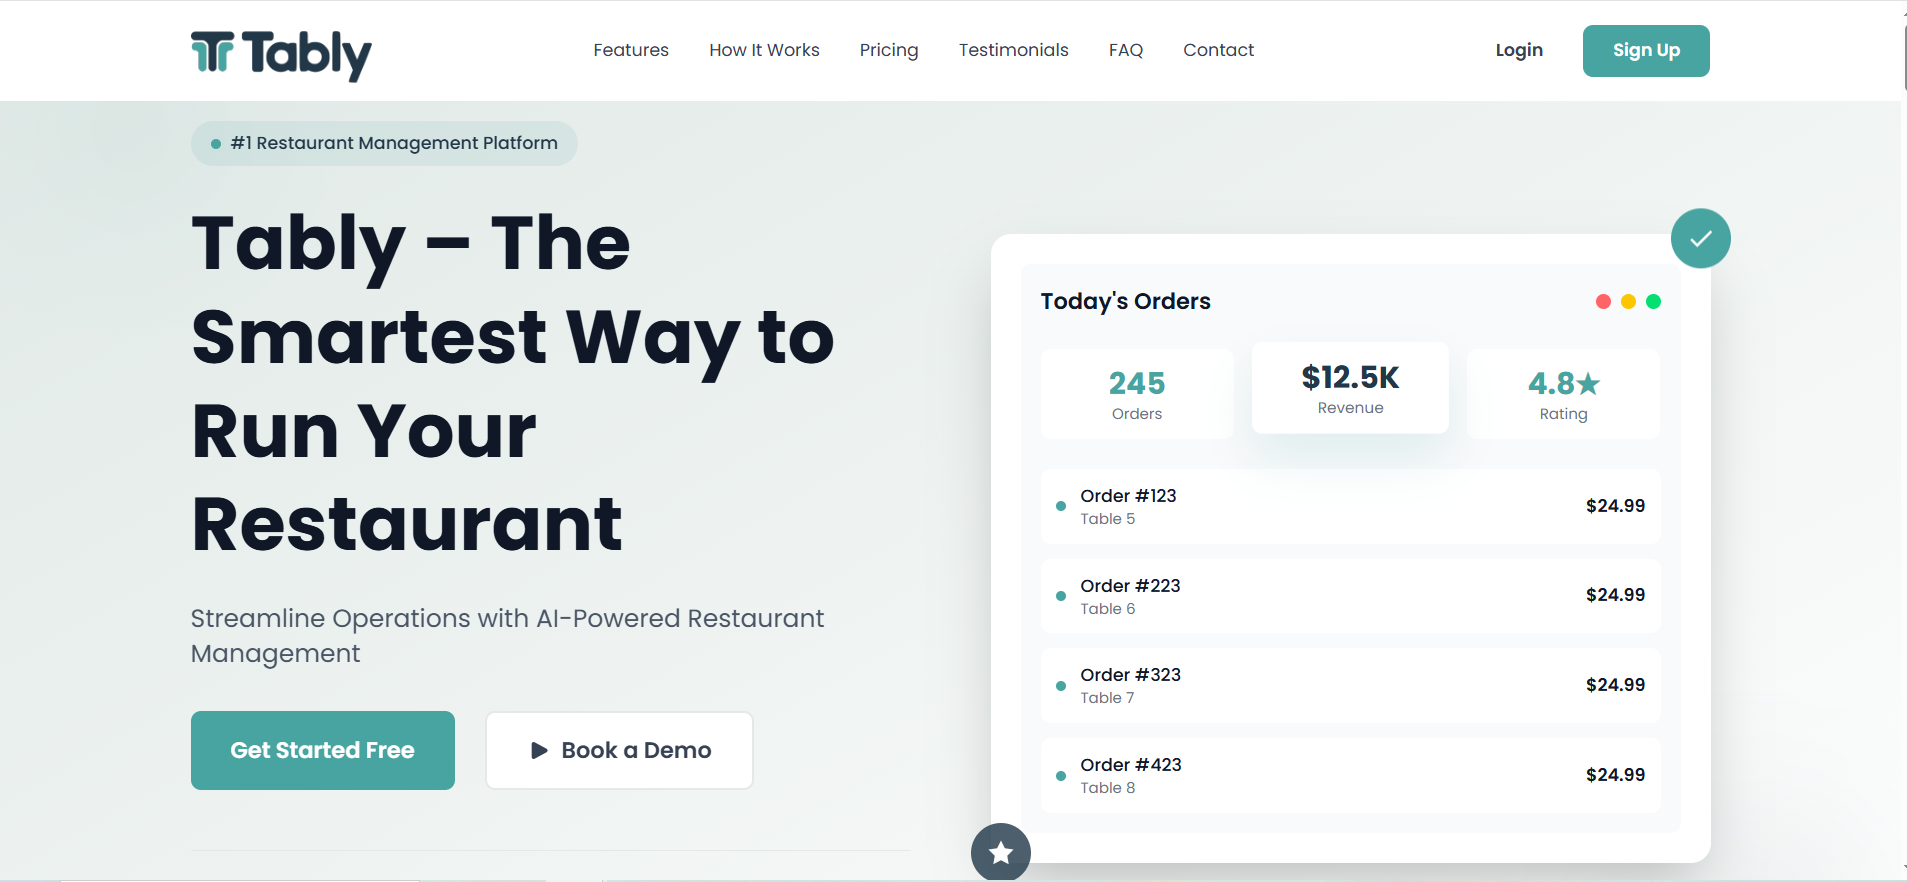
Hero Section Settings Applied on live landing page
Note: For best results, use a high-quality hero image that is at least 1920px wide and has good contrast with your text.
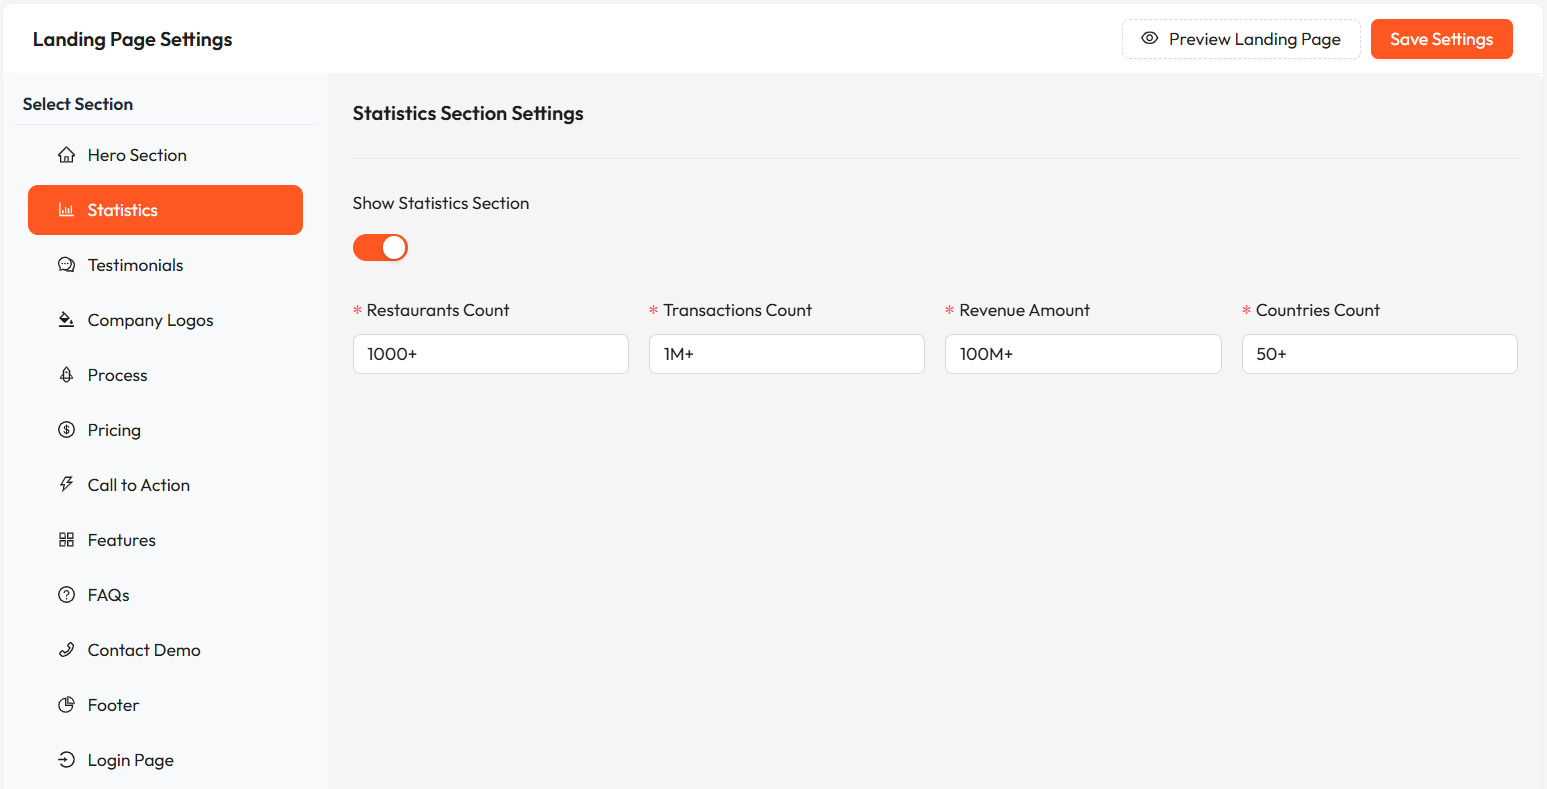
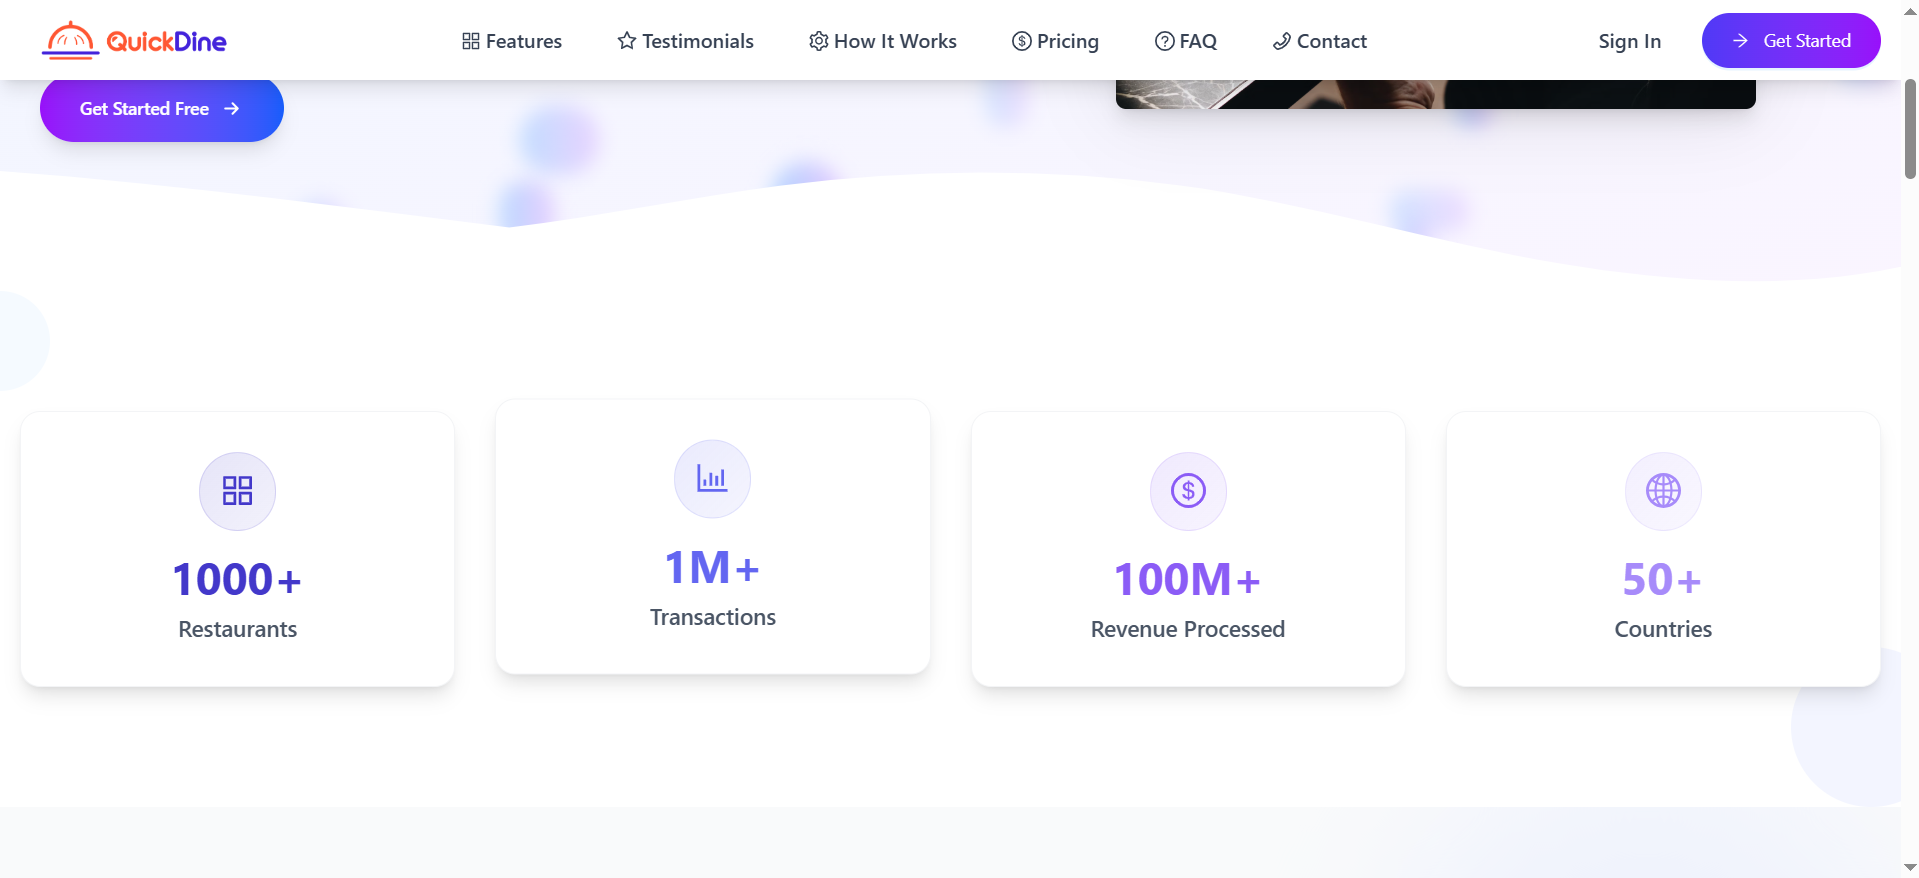
Statistics Section
The Statistics Section displays key metrics about your business to build trust and credibility with potential customers.
Statistics Section Configuration Applied on Live Landing Page
Statistics Section Configuration
Note: Using impressive but honest statistics helps build credibility with your audience.
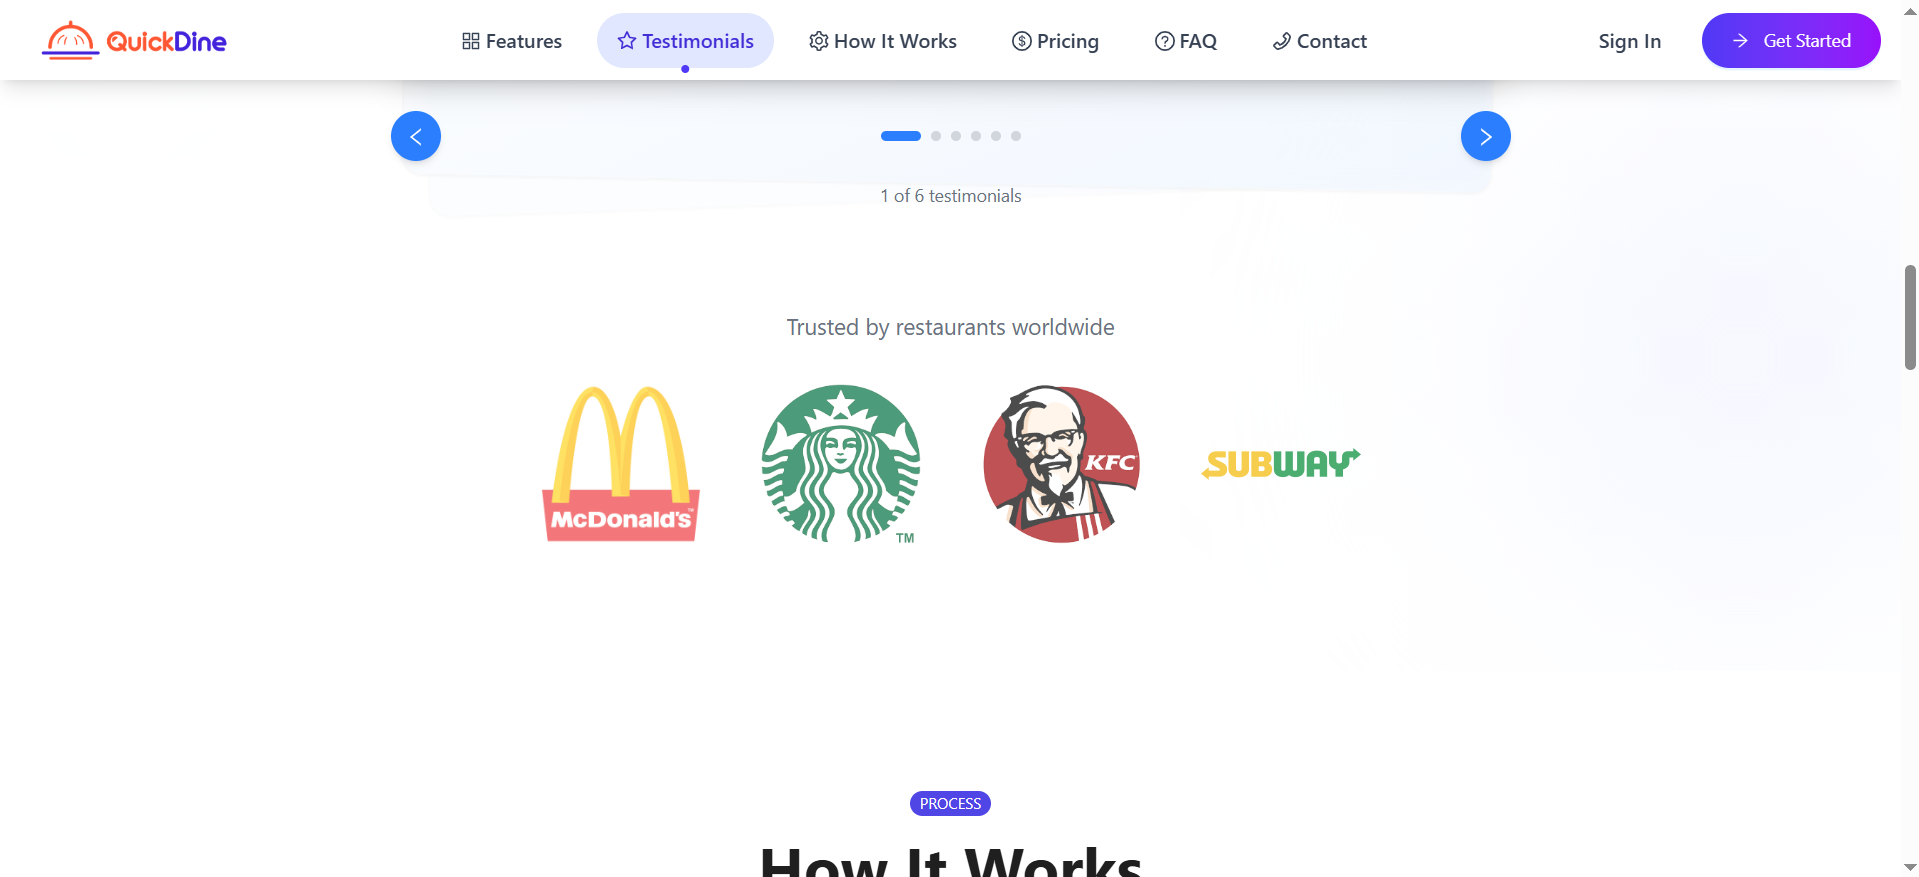
Testimonials
The Testimonials Section showcases positive feedback from satisfied customers, building trust and demonstrating your platform's value.
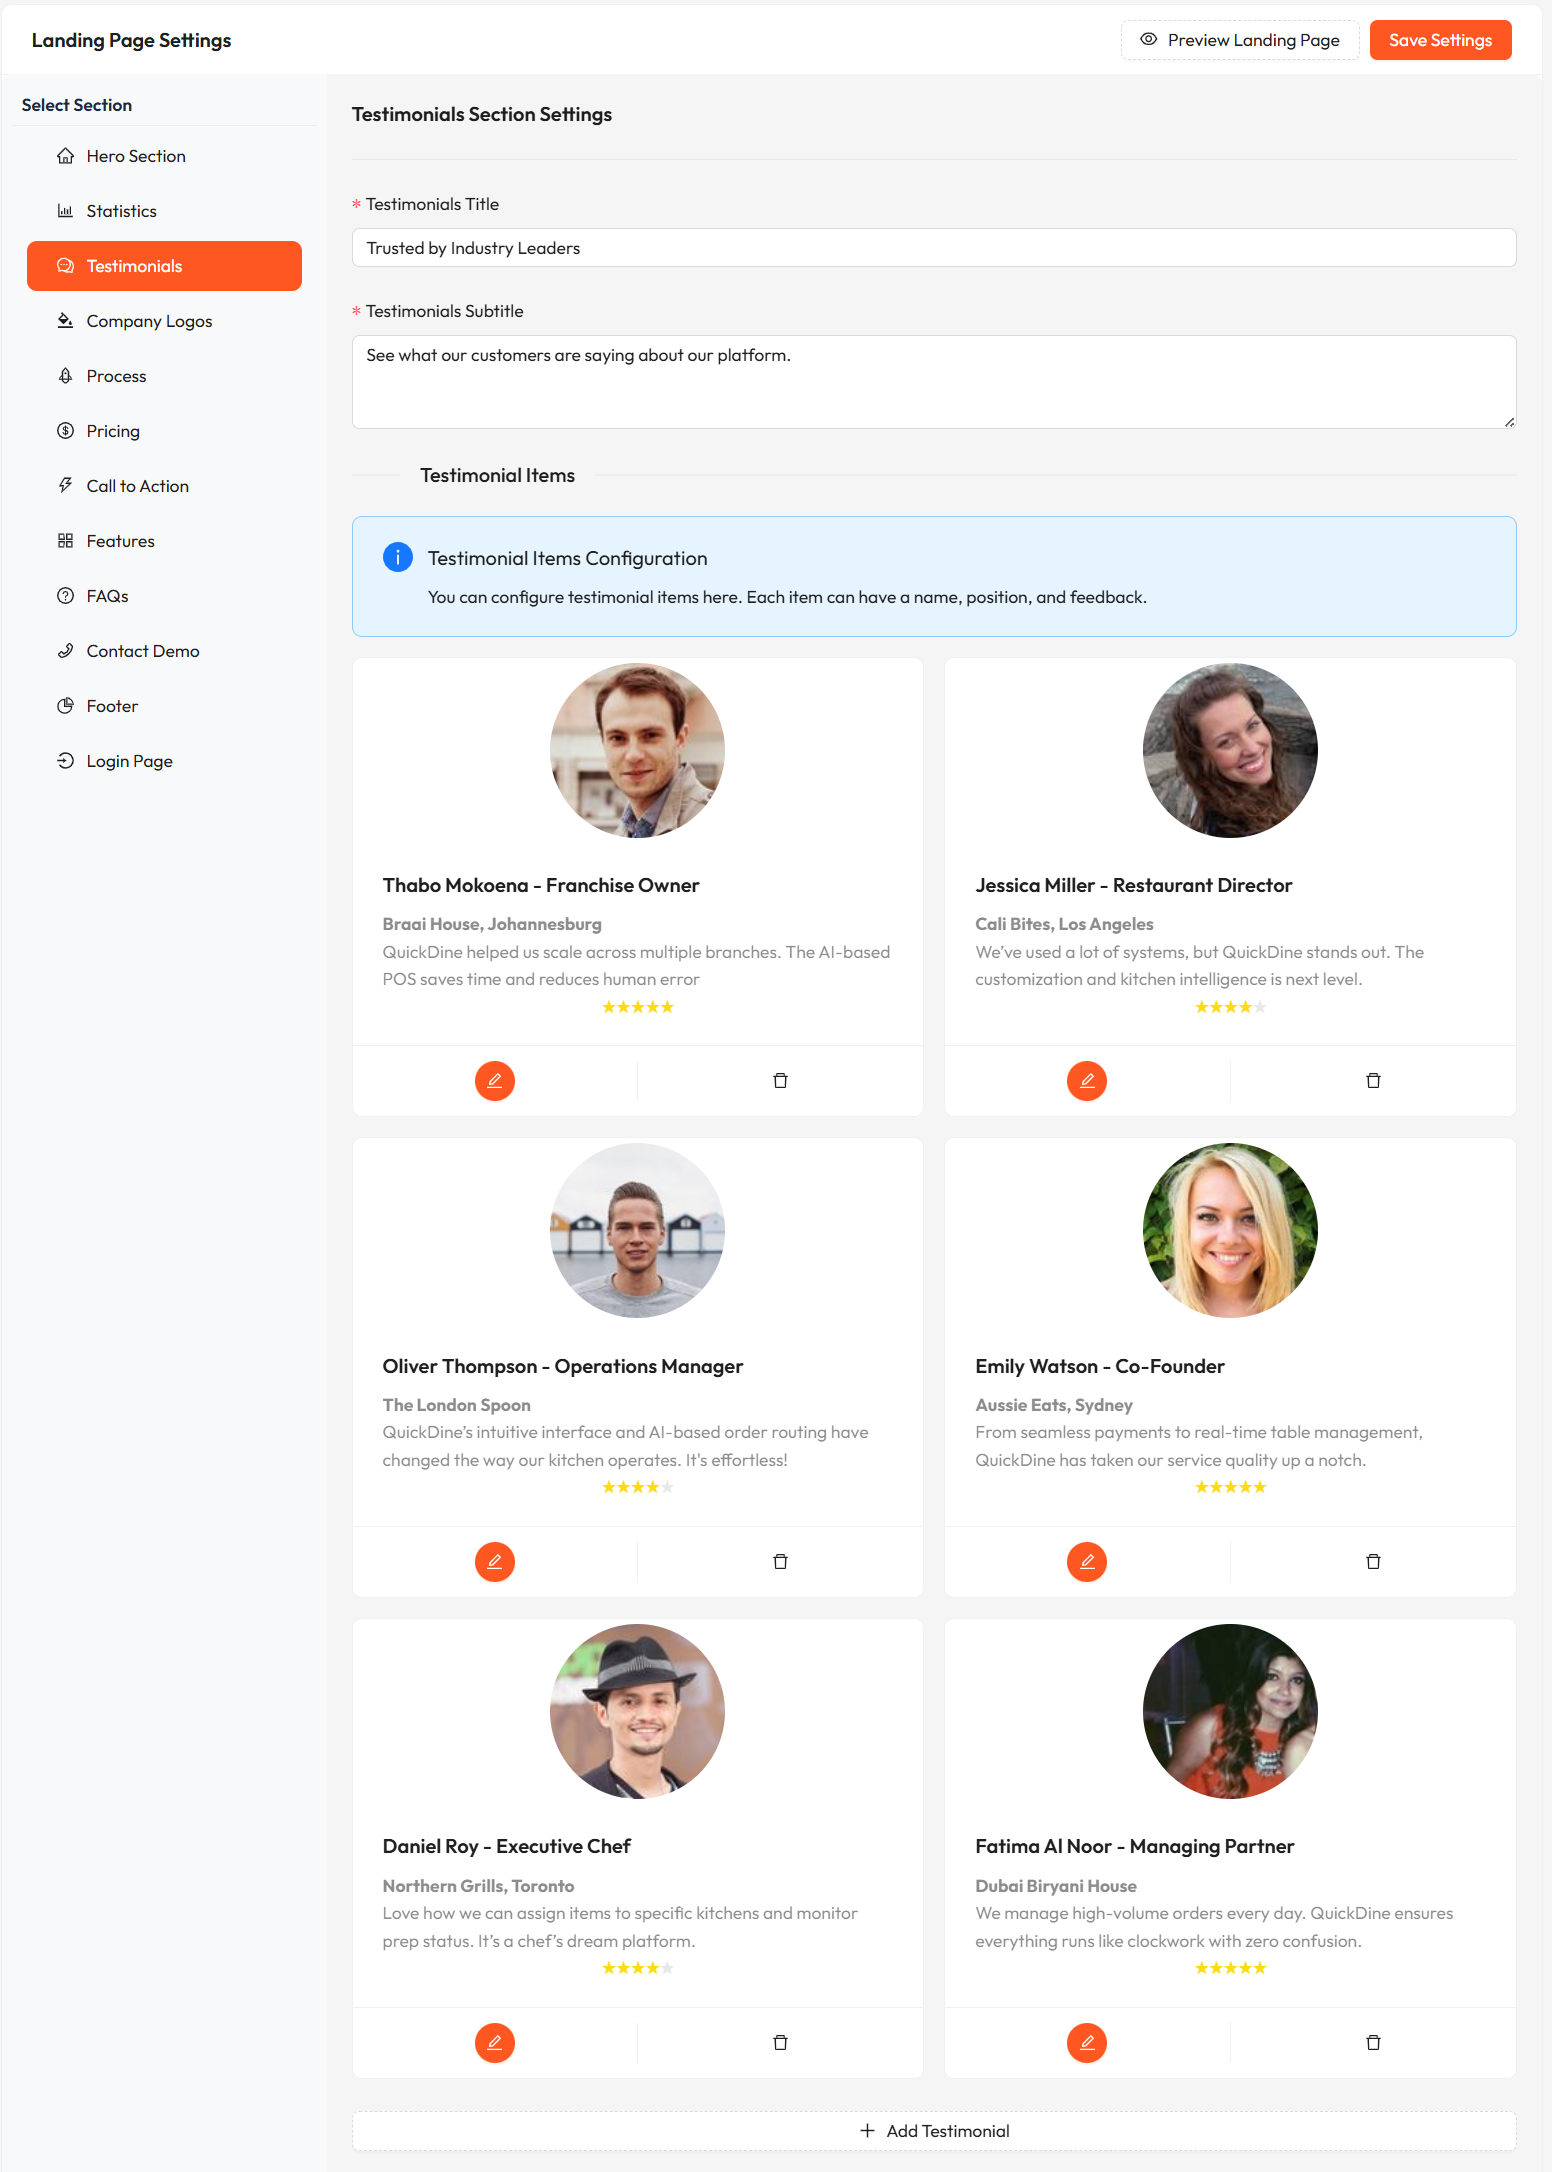
Testimonials Section Configuration
Managing Testimonials
Add, edit, or remove customer testimonials to showcase social proof on your landing page.
- Customer name
- Position/title
- Company/location
- Testimonial text
- Profile photo (recommend square images)
- Star rating

Testimonials Section Configuration Applied on Live section
Company Logos
Display partner or client company logos to establish credibility and showcase the businesses that trust your platform.
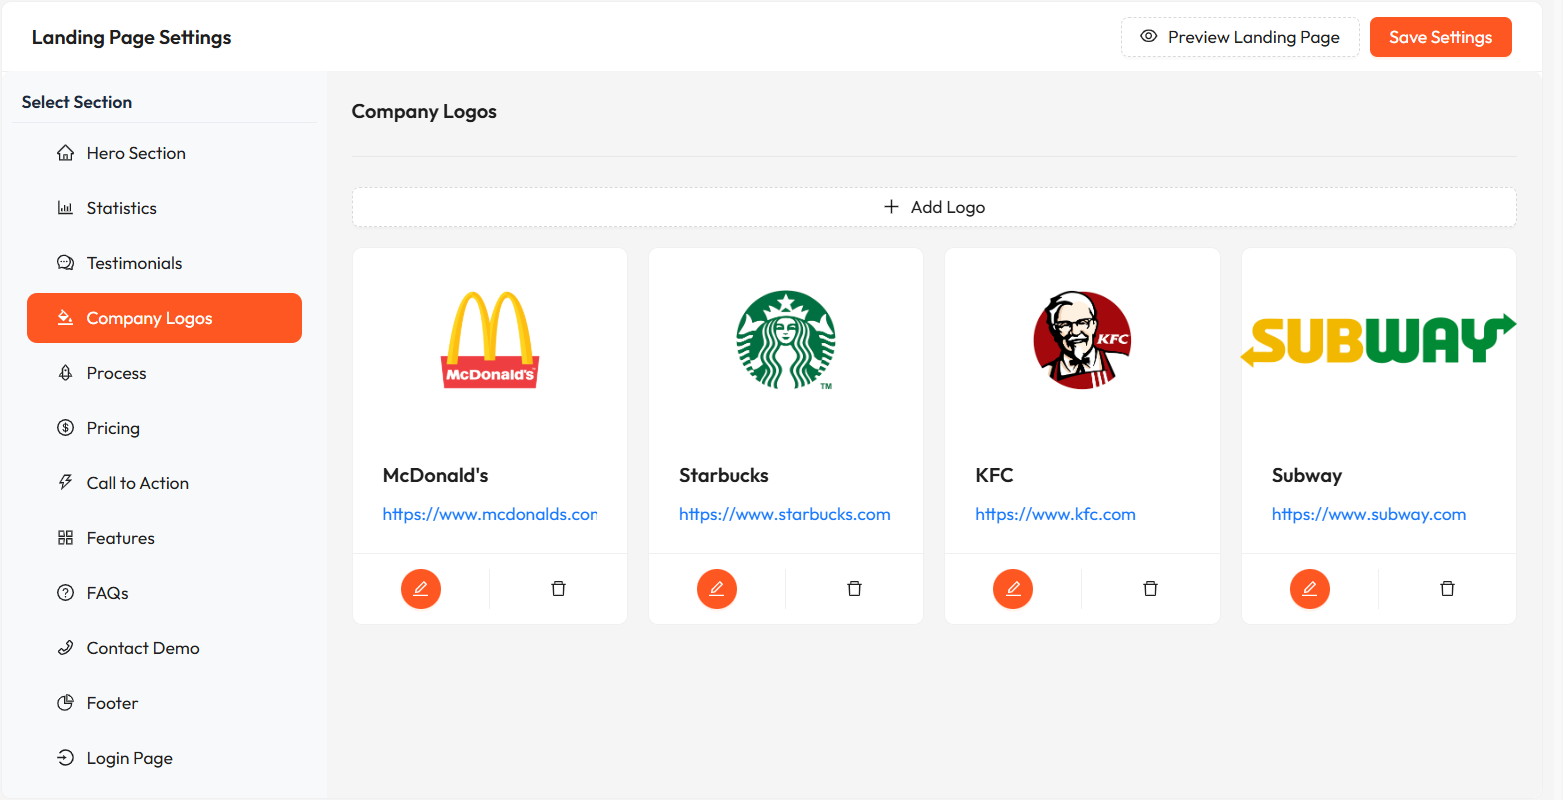
Company Logos Section Configuration
- Company name
- Company website URL (optional)
- Company logo image
Company Logos Section Configuration Applied on Live section
Note: For best results, use transparent PNG logos with similar dimensions for a consistent appearance.
Process Steps
The Process Section outlines how your restaurant management system works, guiding potential customers through the journey from order to service.
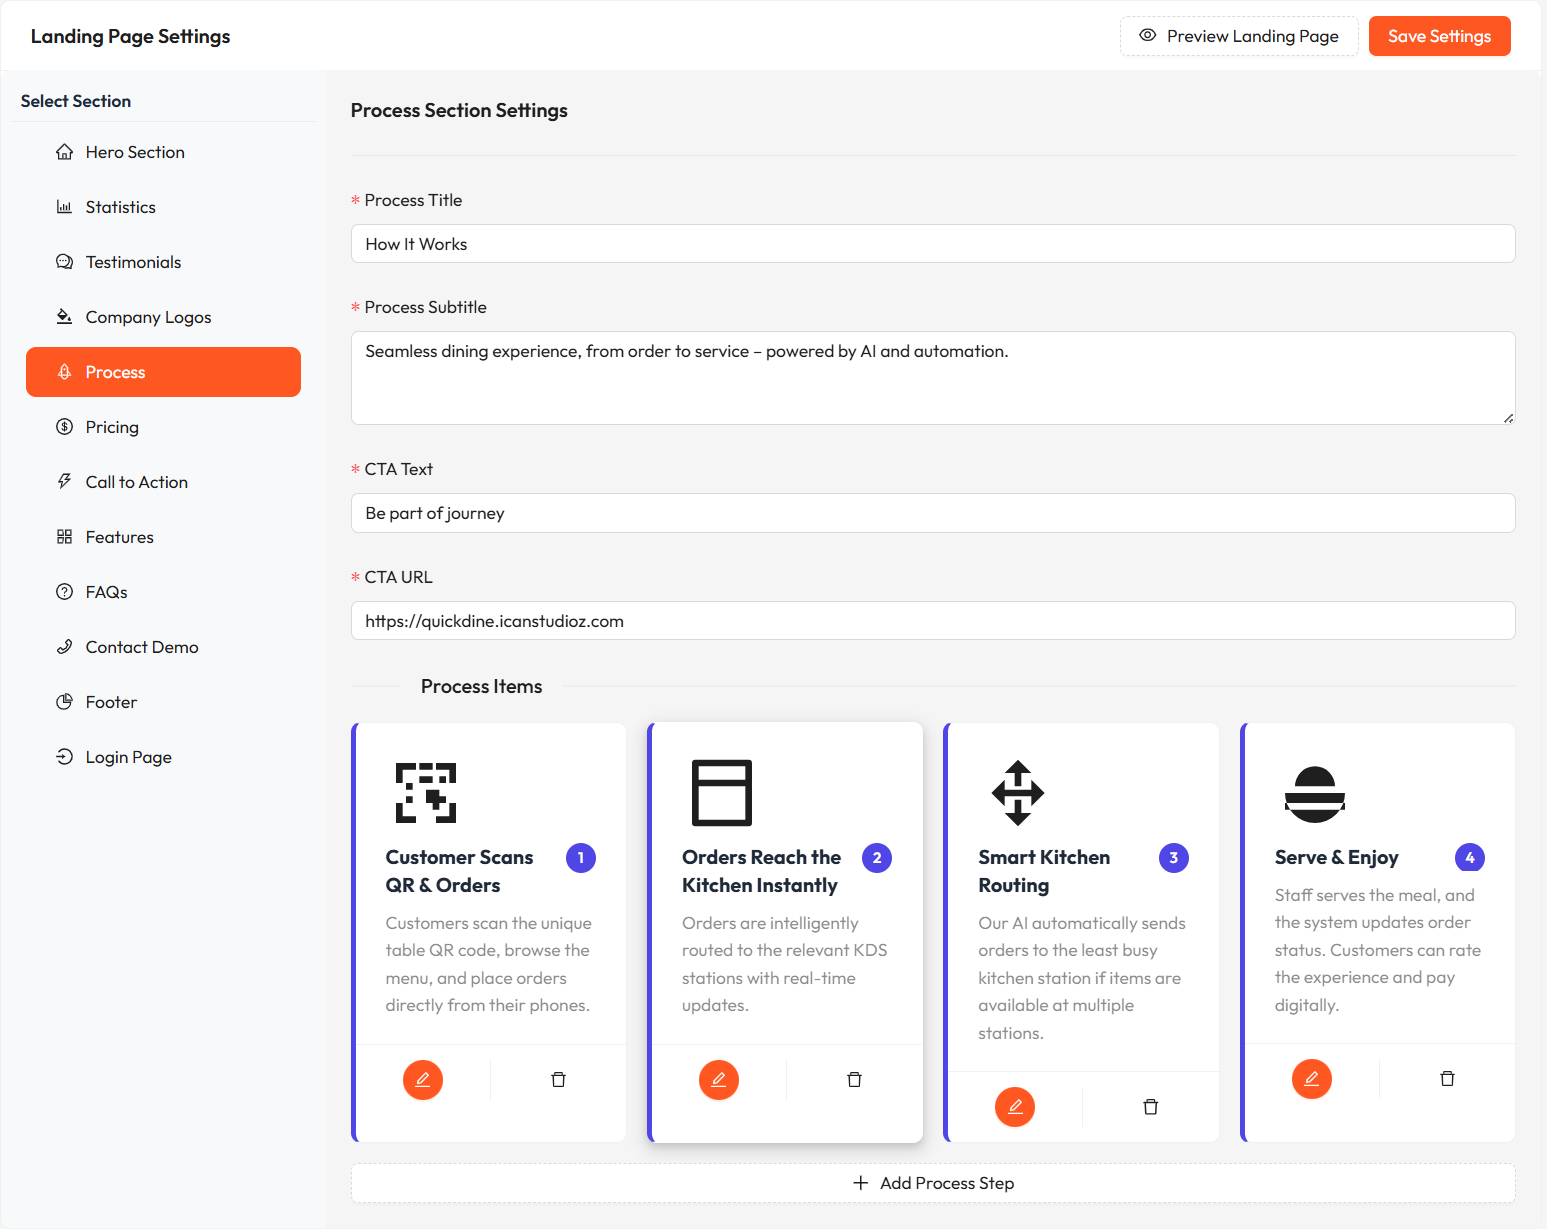
Process Section Configuration
- Step title
- Step description
- Icon or image
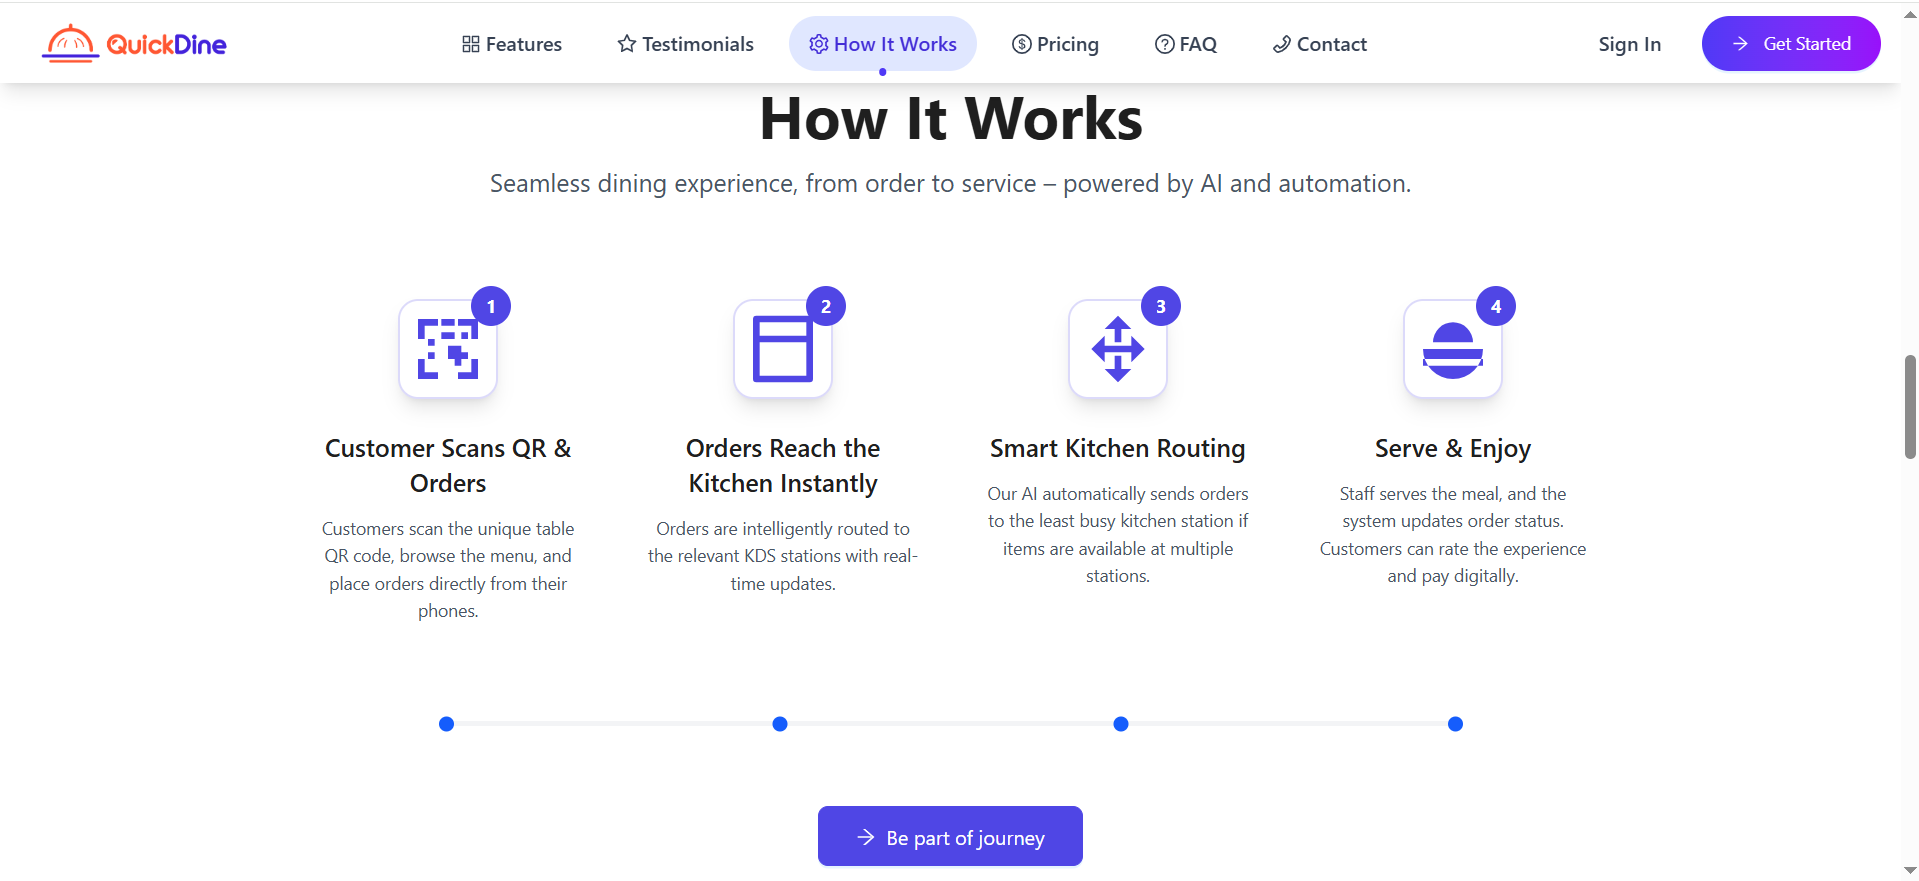
Process Section Configuration Applied on Live section
Pricing & Packages
The Pricing Section allows you to showcase your subscription plans and packages to potential customers, providing clear information about features and pricing options.
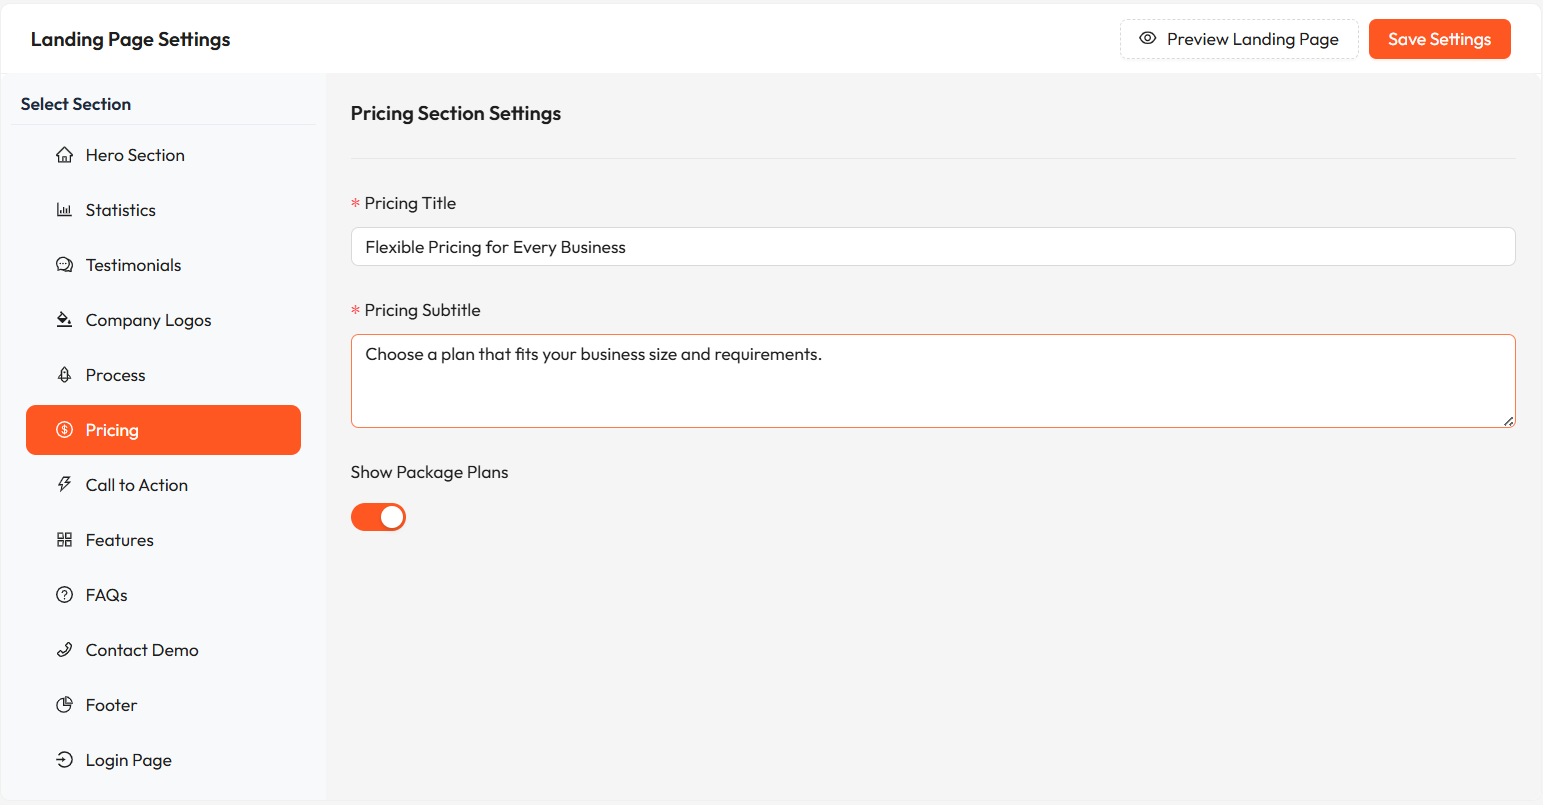
Pricing Section Configuration
- Package name
- Package description
- Price and billing period
- Featured benefits
- Call-to-action button
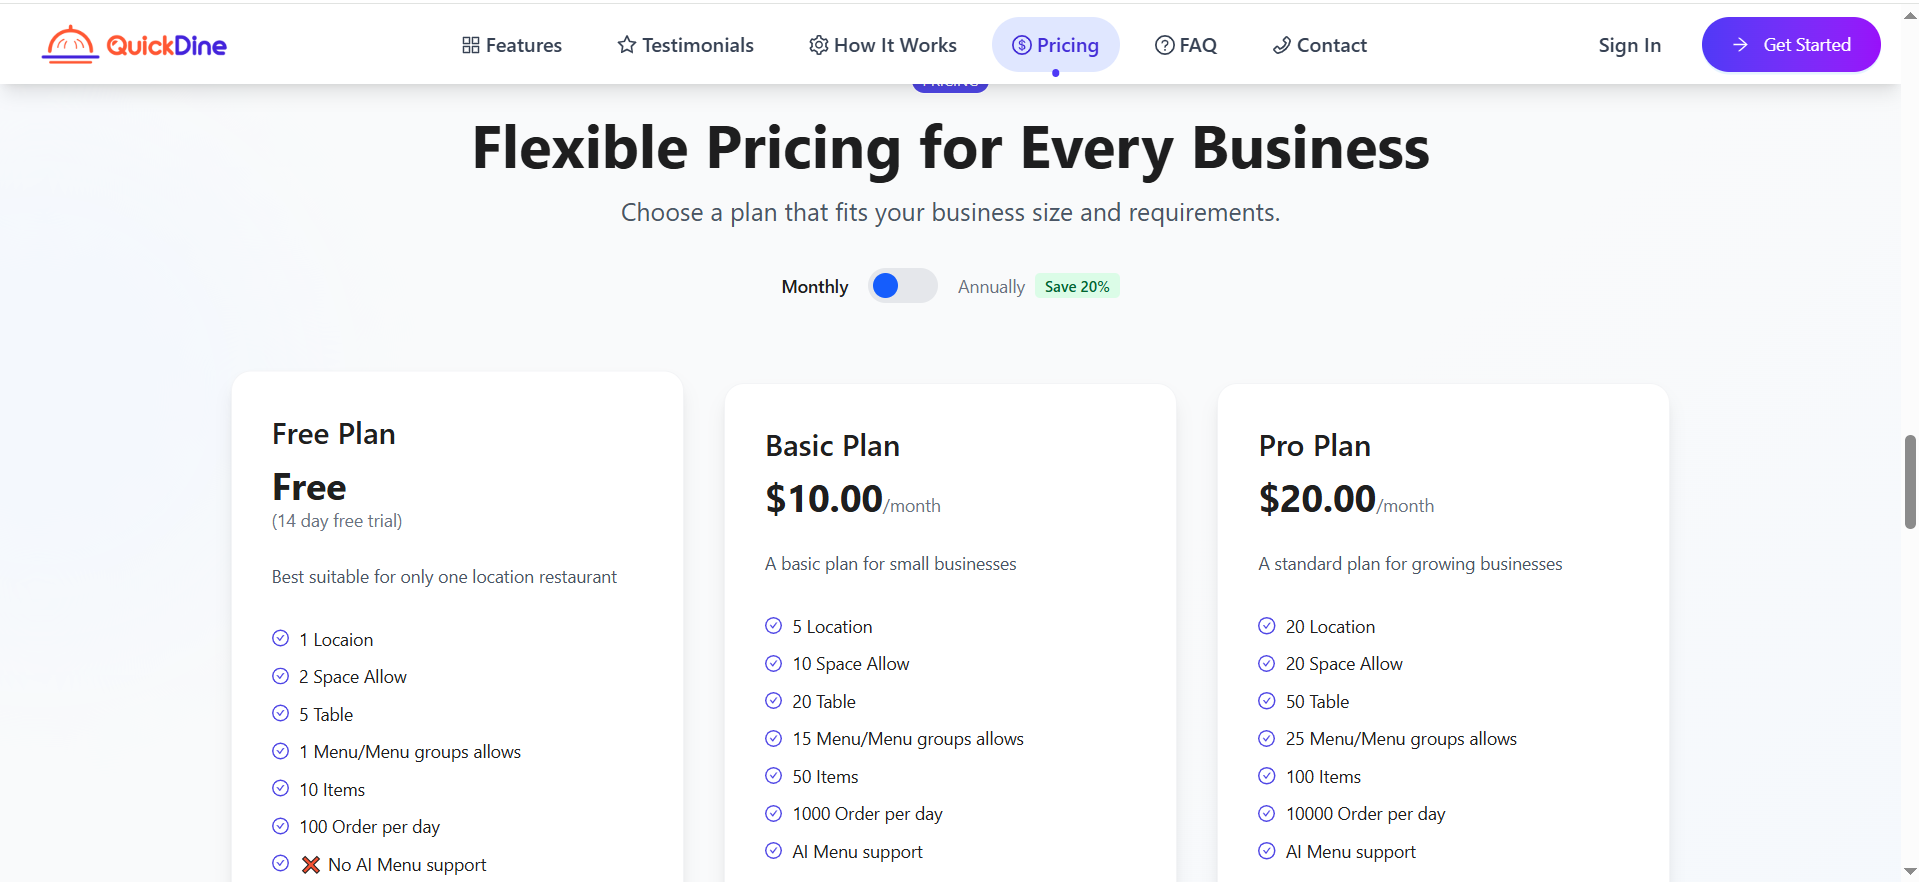
Pricing Section Configuration Applied on Live section
Note: To add or modify packages, you need to configure them in the Subscription Packages section of your Super Admin Settings. The pricing section will automatically reflect these packages.
Call to Action
The Call to Action (CTA) section prompts visitors to take a specific action, such as scheduling a demo or signing up for your service.
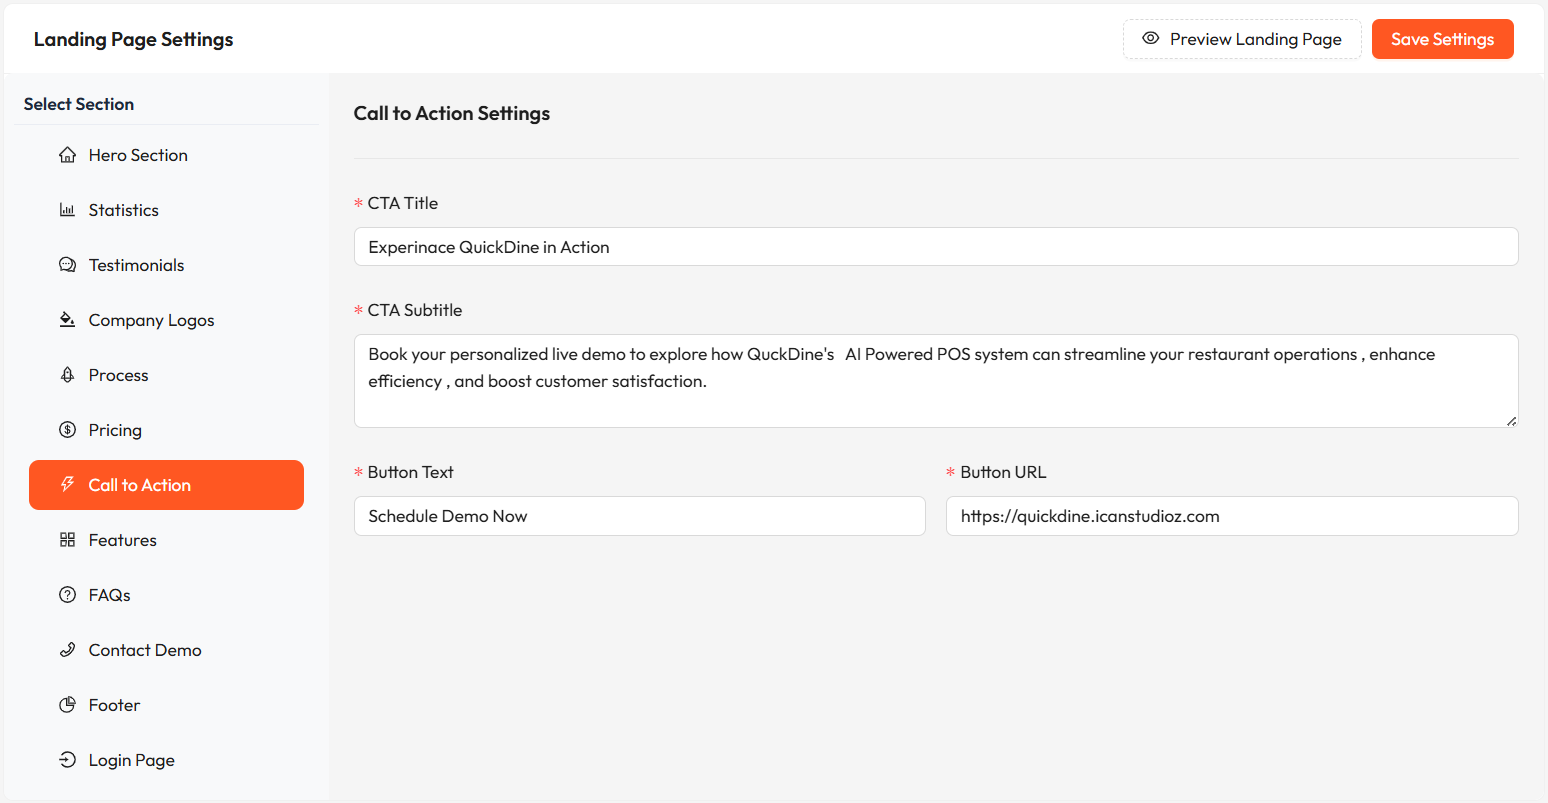
Call to Action Section Configuration
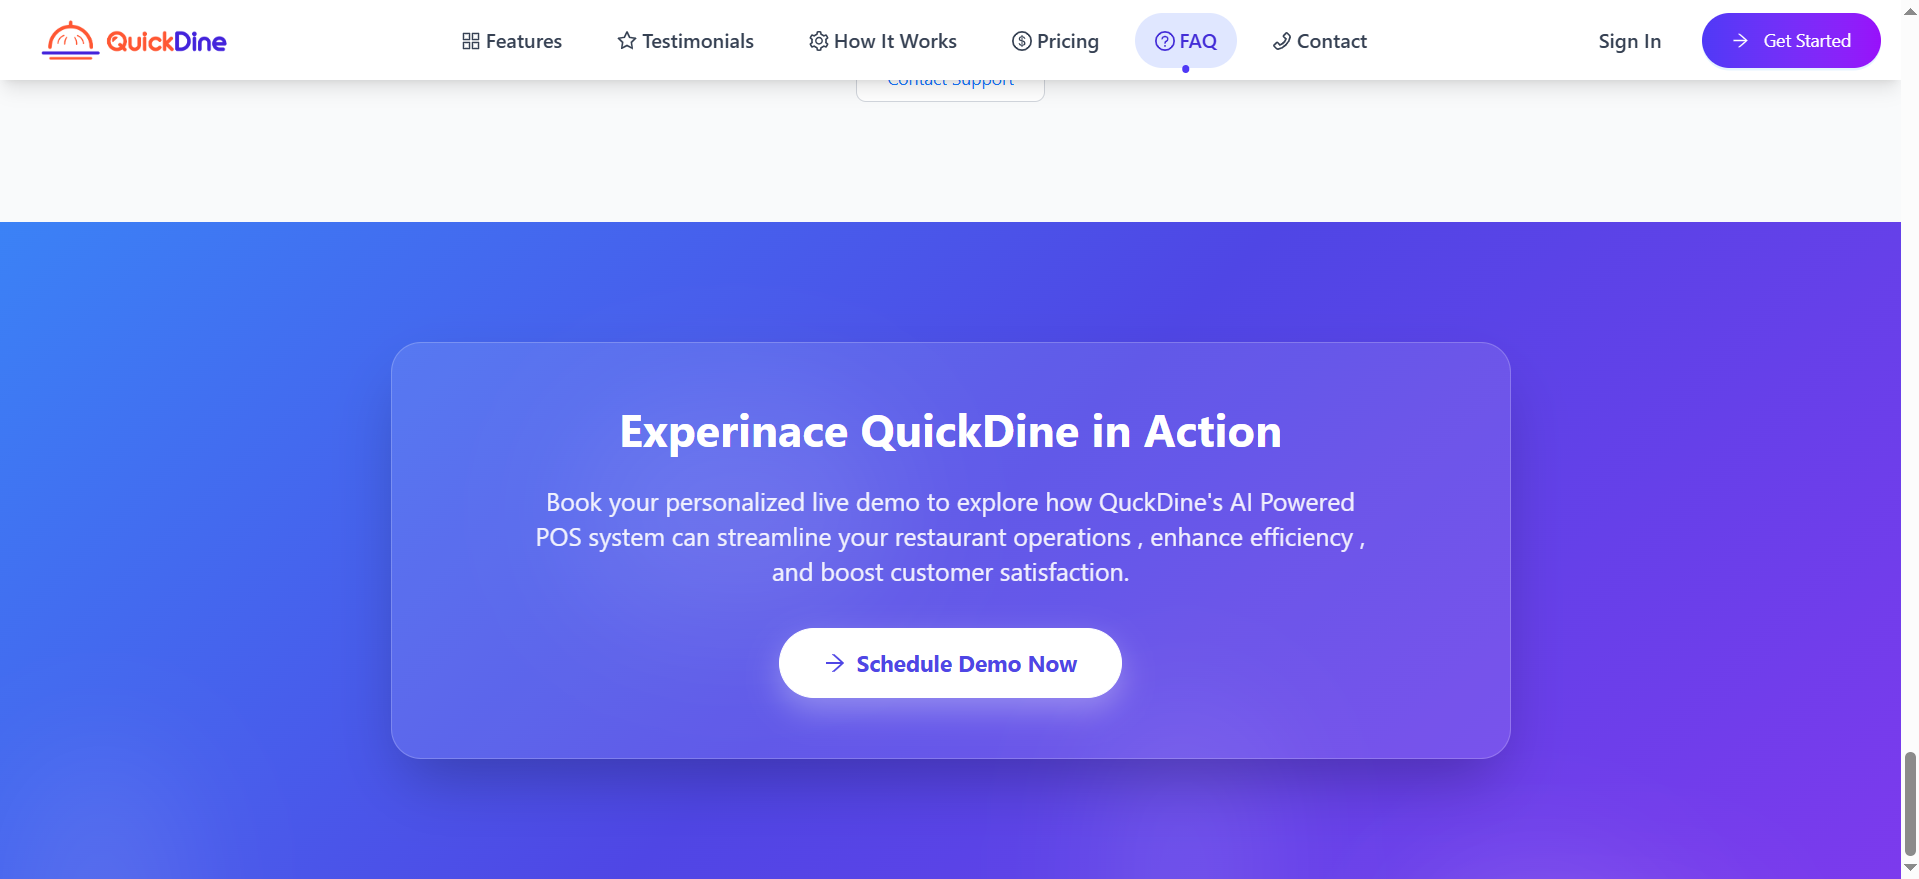
Call to Action Section Configuration Applied on Live section
Use action-oriented language in your CTA button text, such as "Get Started," "Book Now," or "See Demo" to encourage clicks.
Features List
The Features Section highlights the key capabilities and benefits of your restaurant management platform.
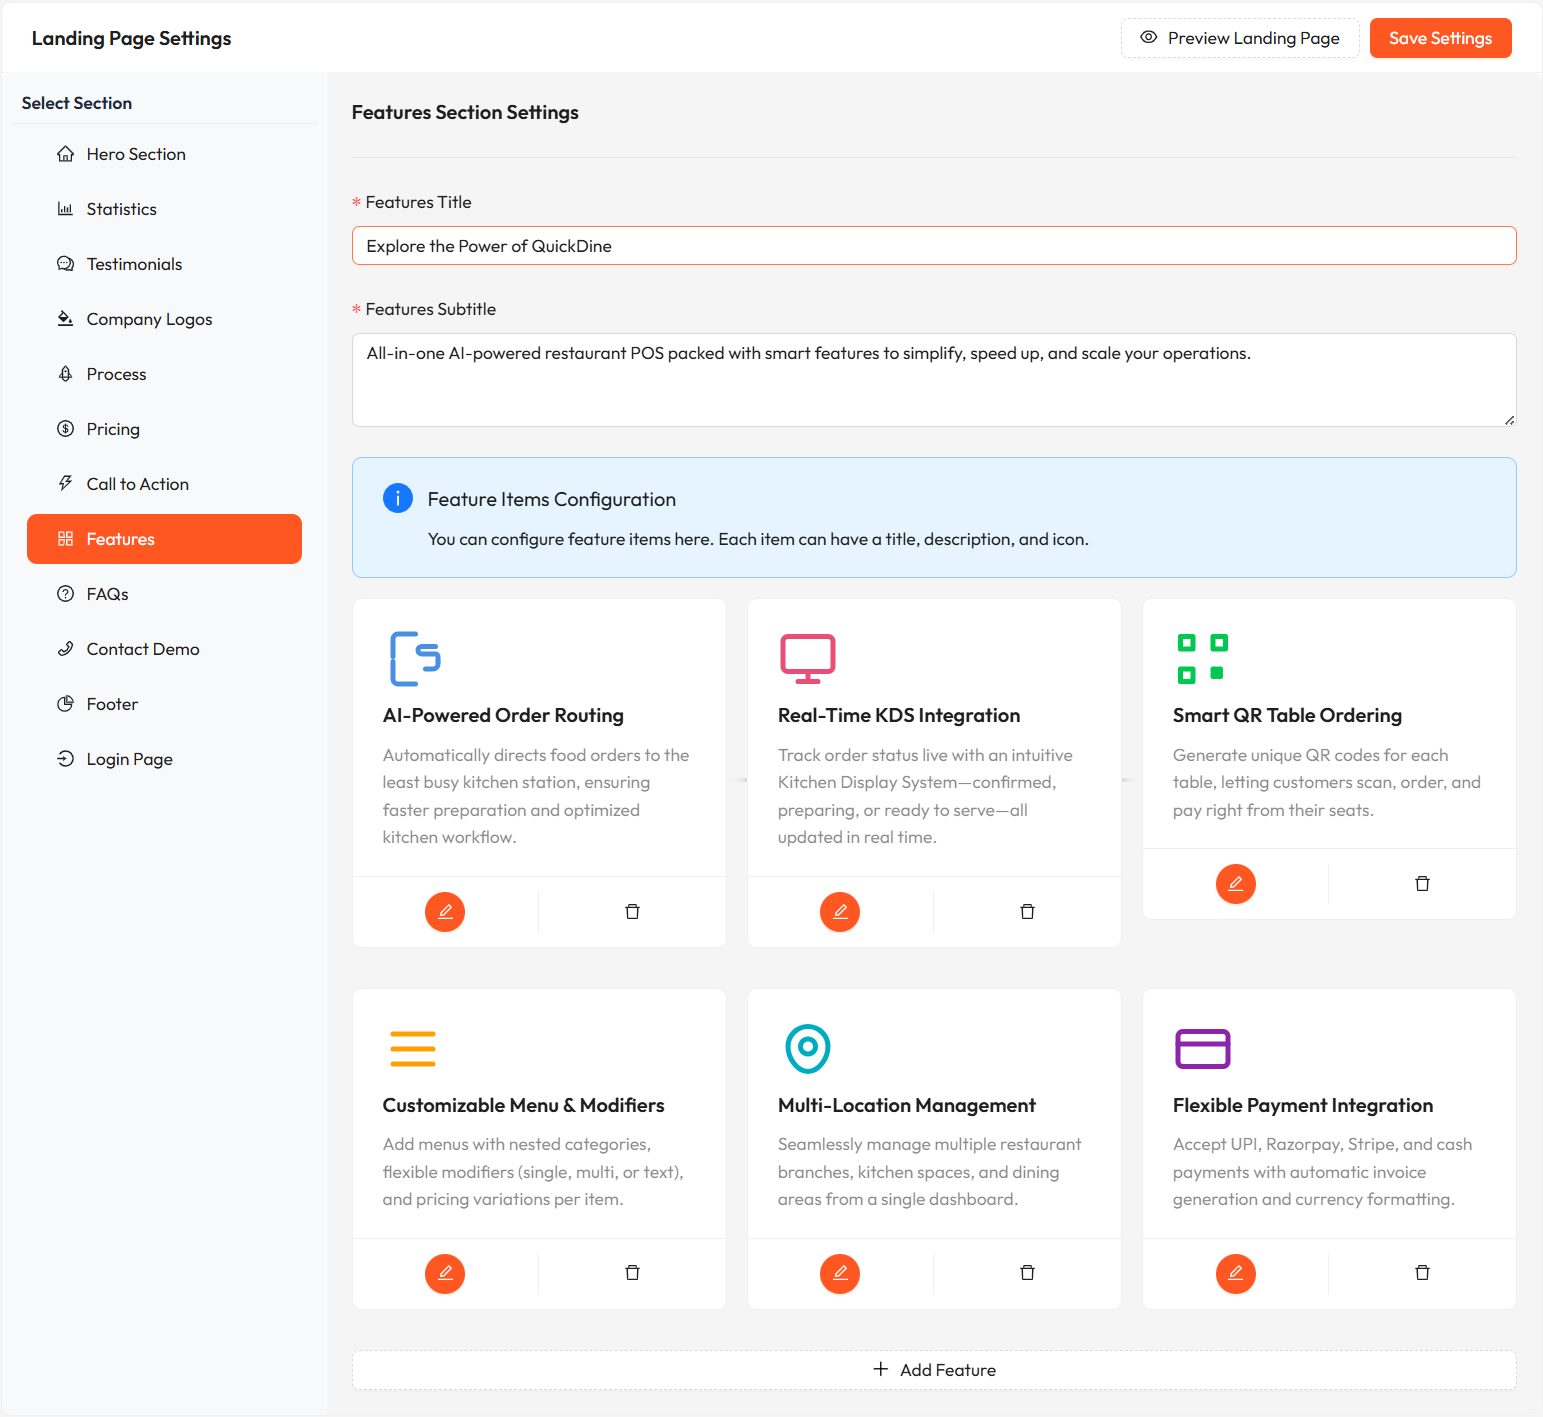
Features Section Configuration
- Feature title
- Feature description
- Feature icon or image
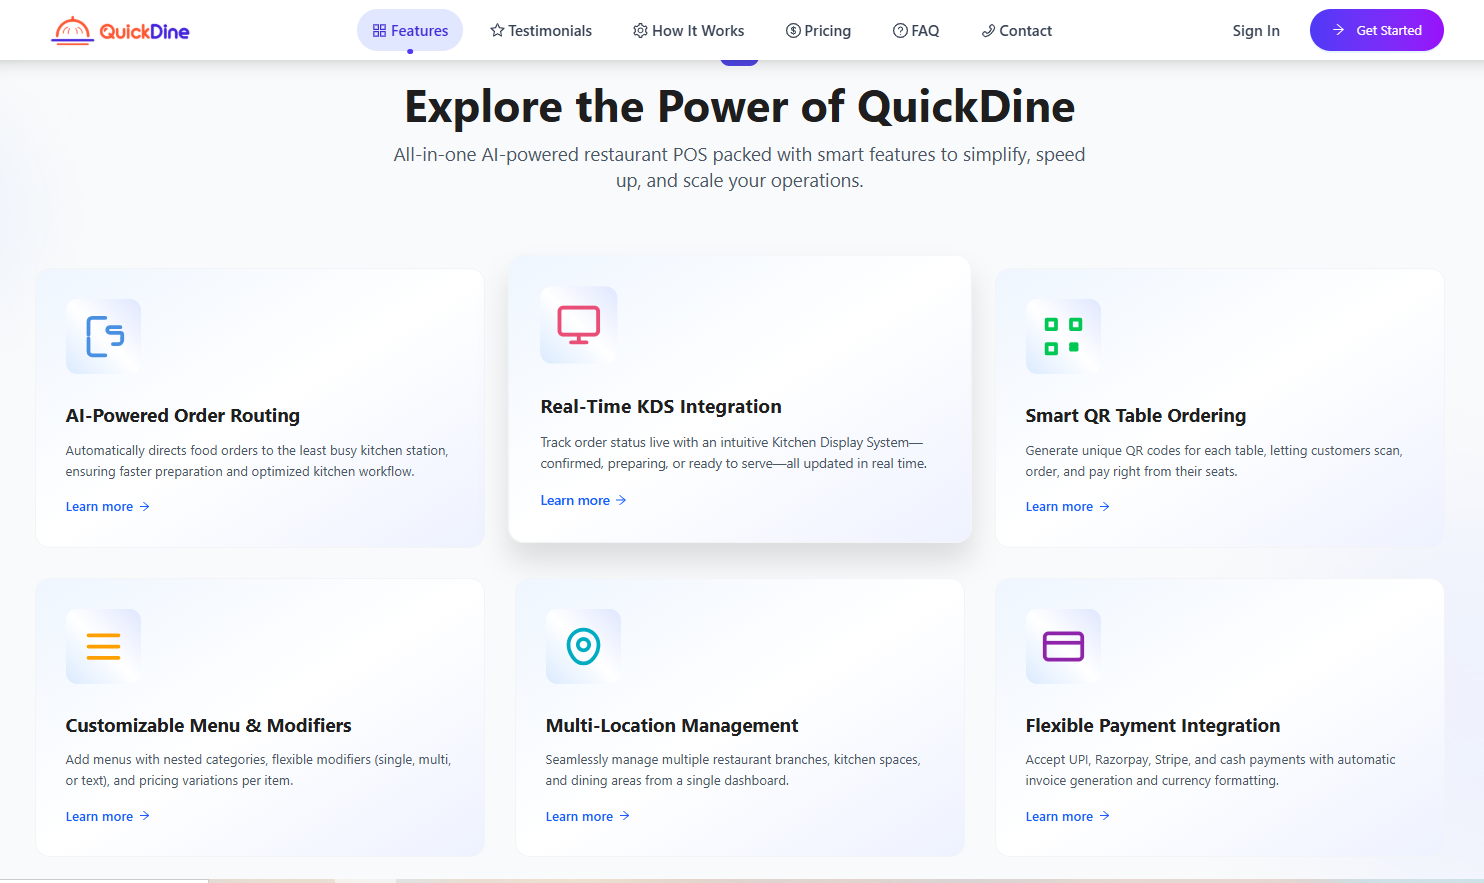
Features Section Configuration Applied on Live section
Note: Focus on benefits rather than just features. Explain how each feature solves a problem for restaurant owners.
FAQ Settings
The FAQ (Frequently Asked Questions) section addresses common questions potential customers might have about your platform.
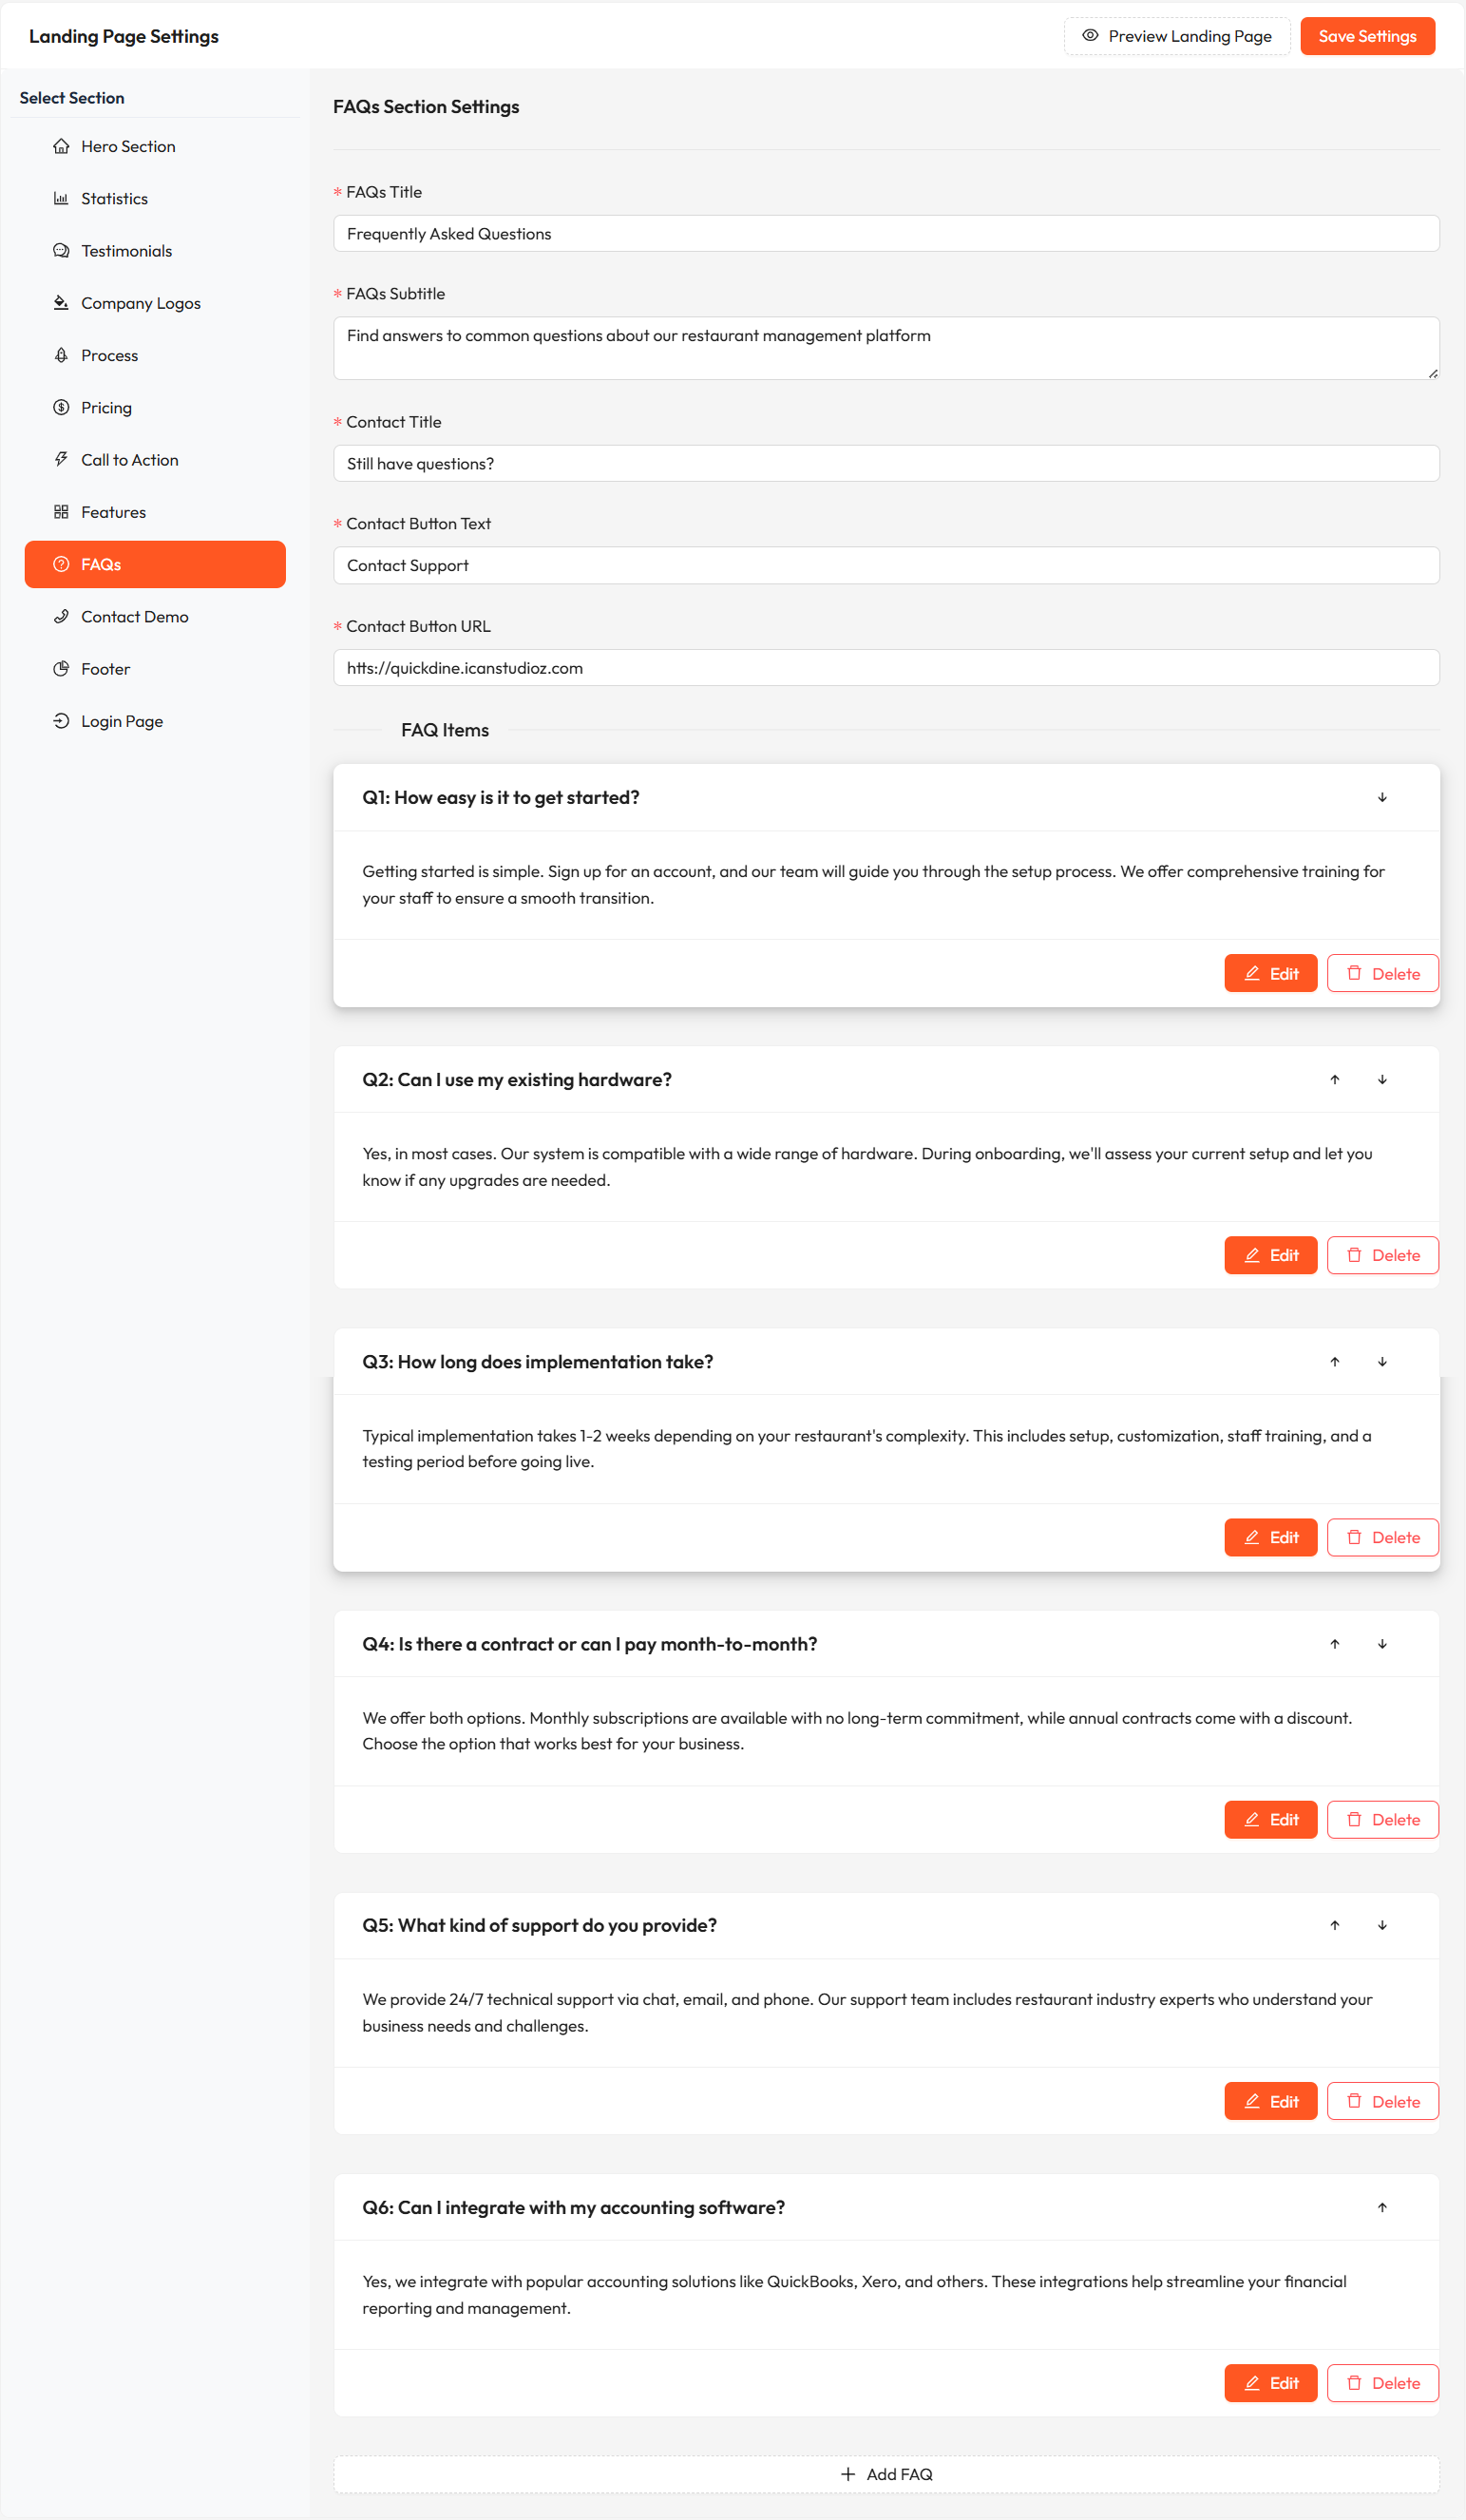
FAQ Section Configuration
- Question
- Answer
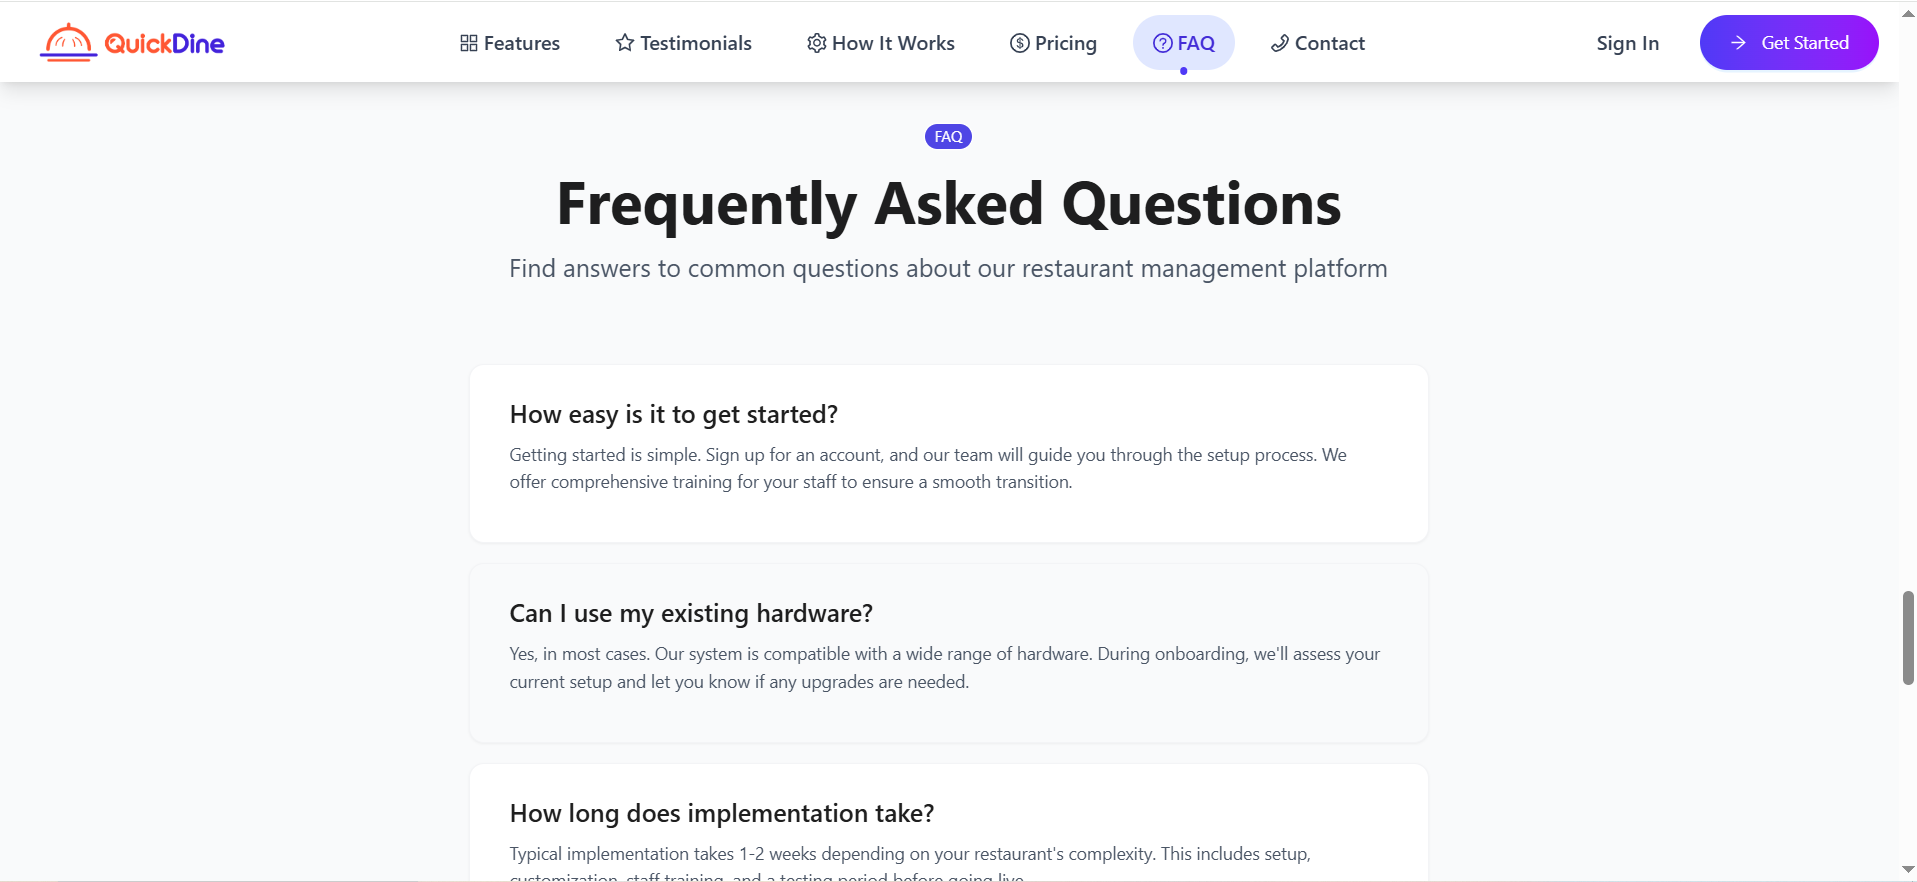
FAQ Section Configuration Applied on Live section
Note: Address real questions that potential customers are likely to ask. This not only helps users but can also improve SEO by targeting common search queries.
Contact Demo
The Contact Demo section allows potential customers to request a personalized demonstration of your platform.
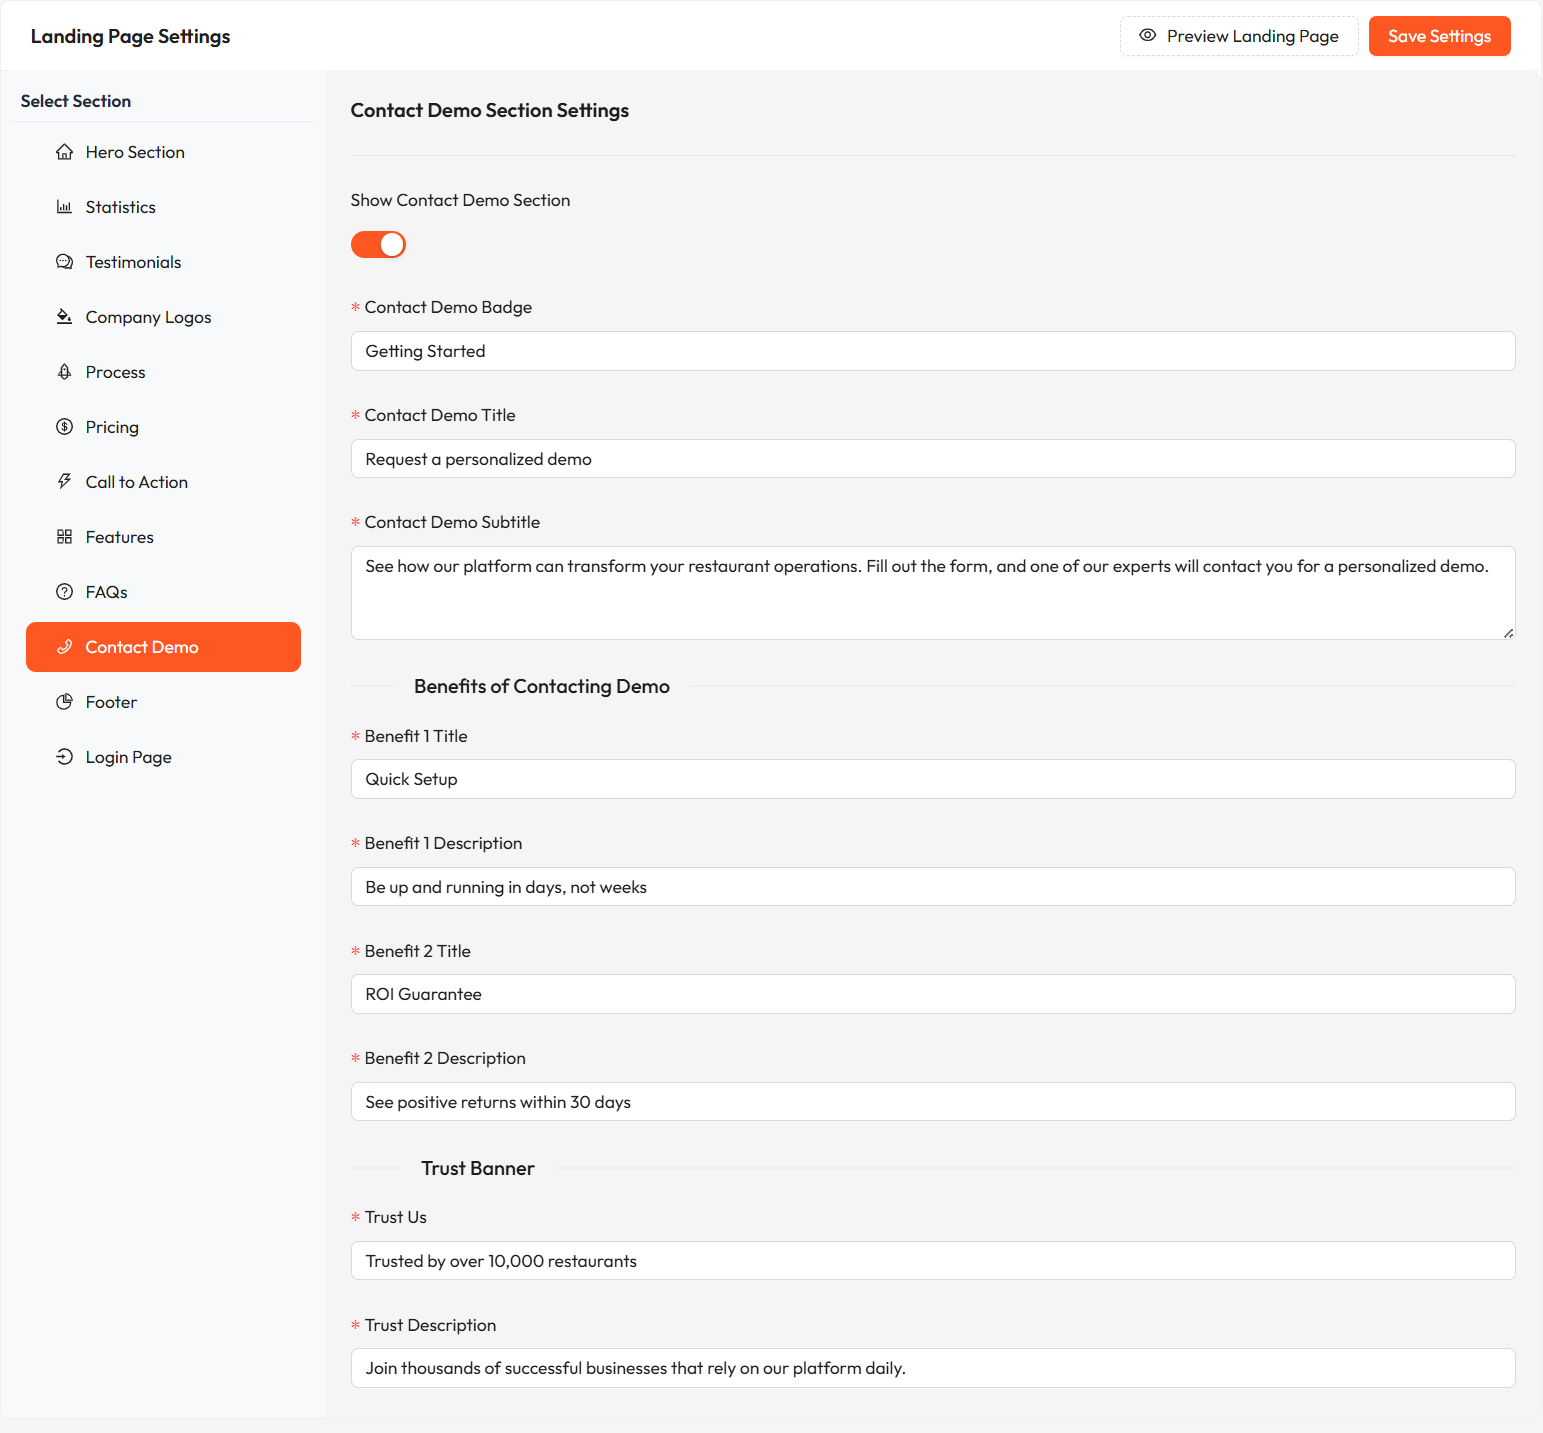
Contact Demo Section Configuration
- Benefit titles
- Benefit descriptions
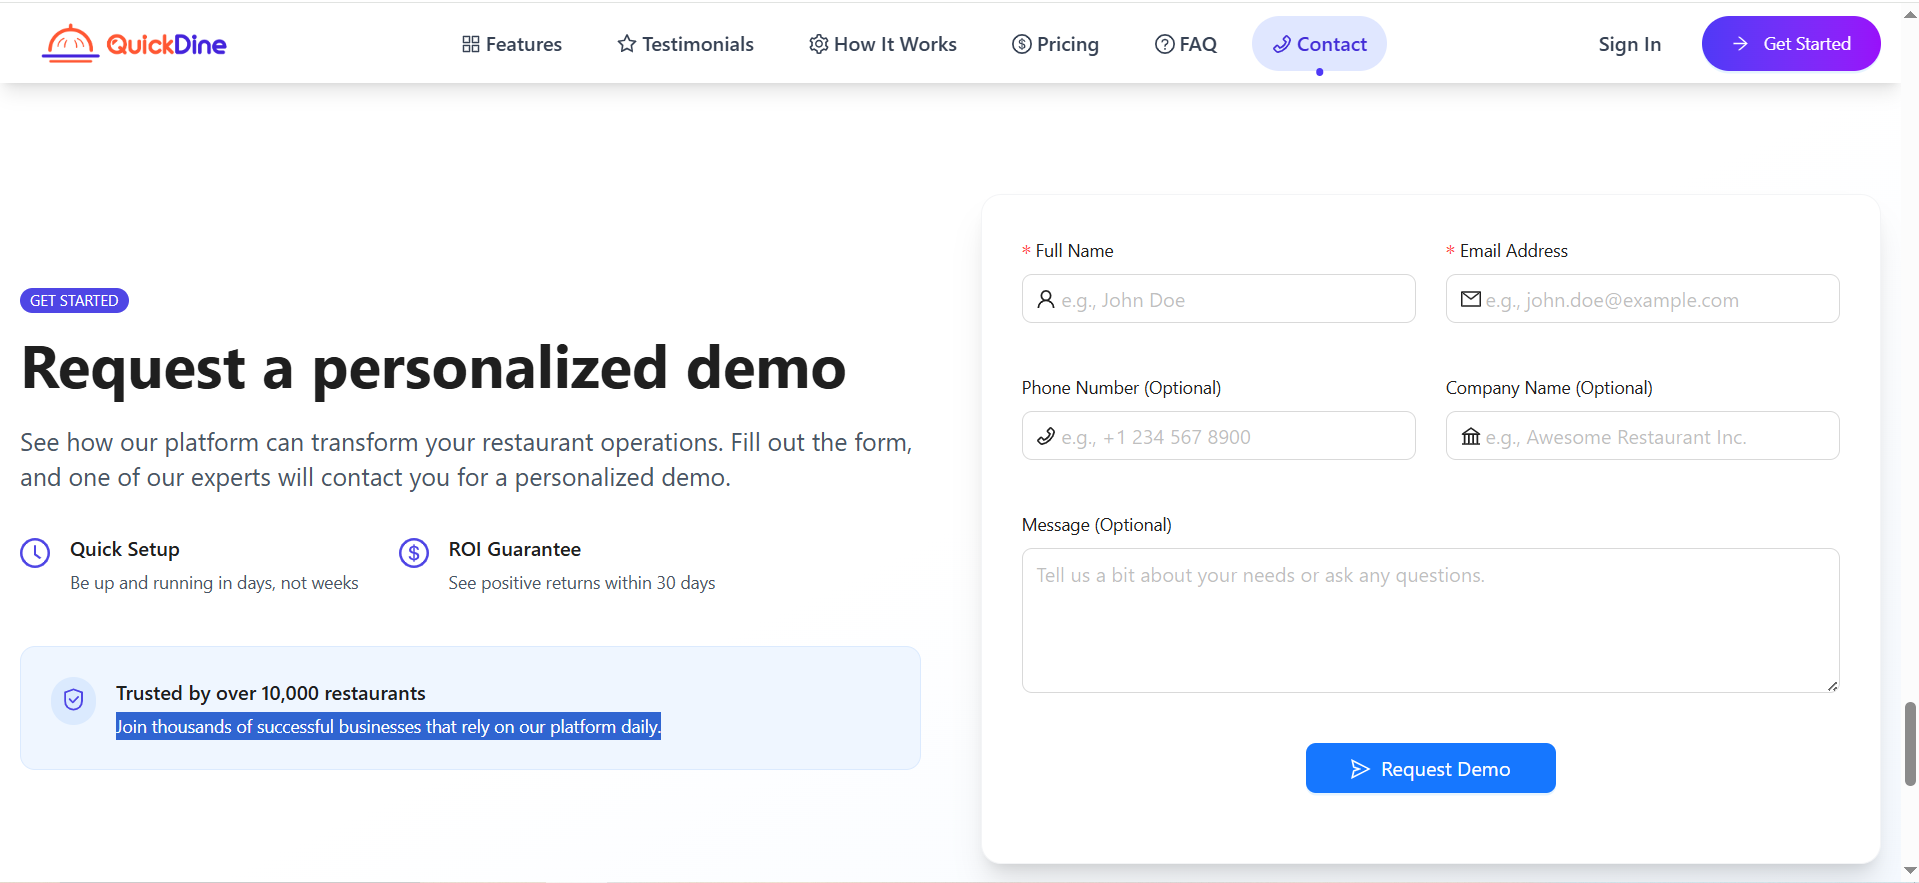
Contact Demo Section Configuration Applied on Live section
Footer Settings
The Footer section appears at the bottom of your landing page and typically contains important links, contact information, and legal disclaimers.
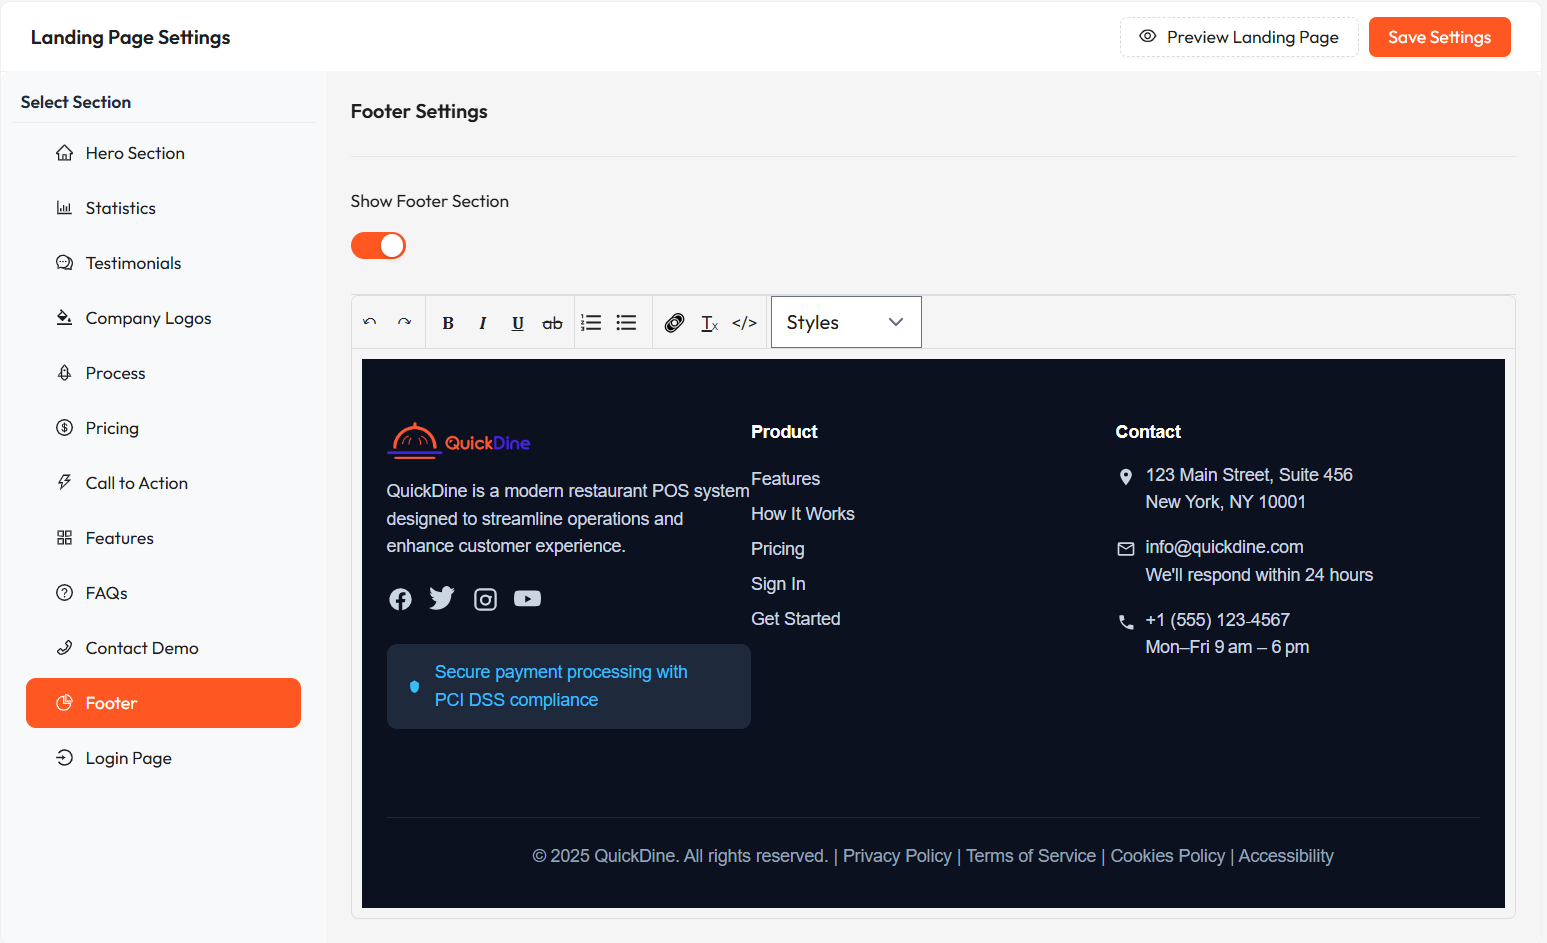
Footer Section Configuration
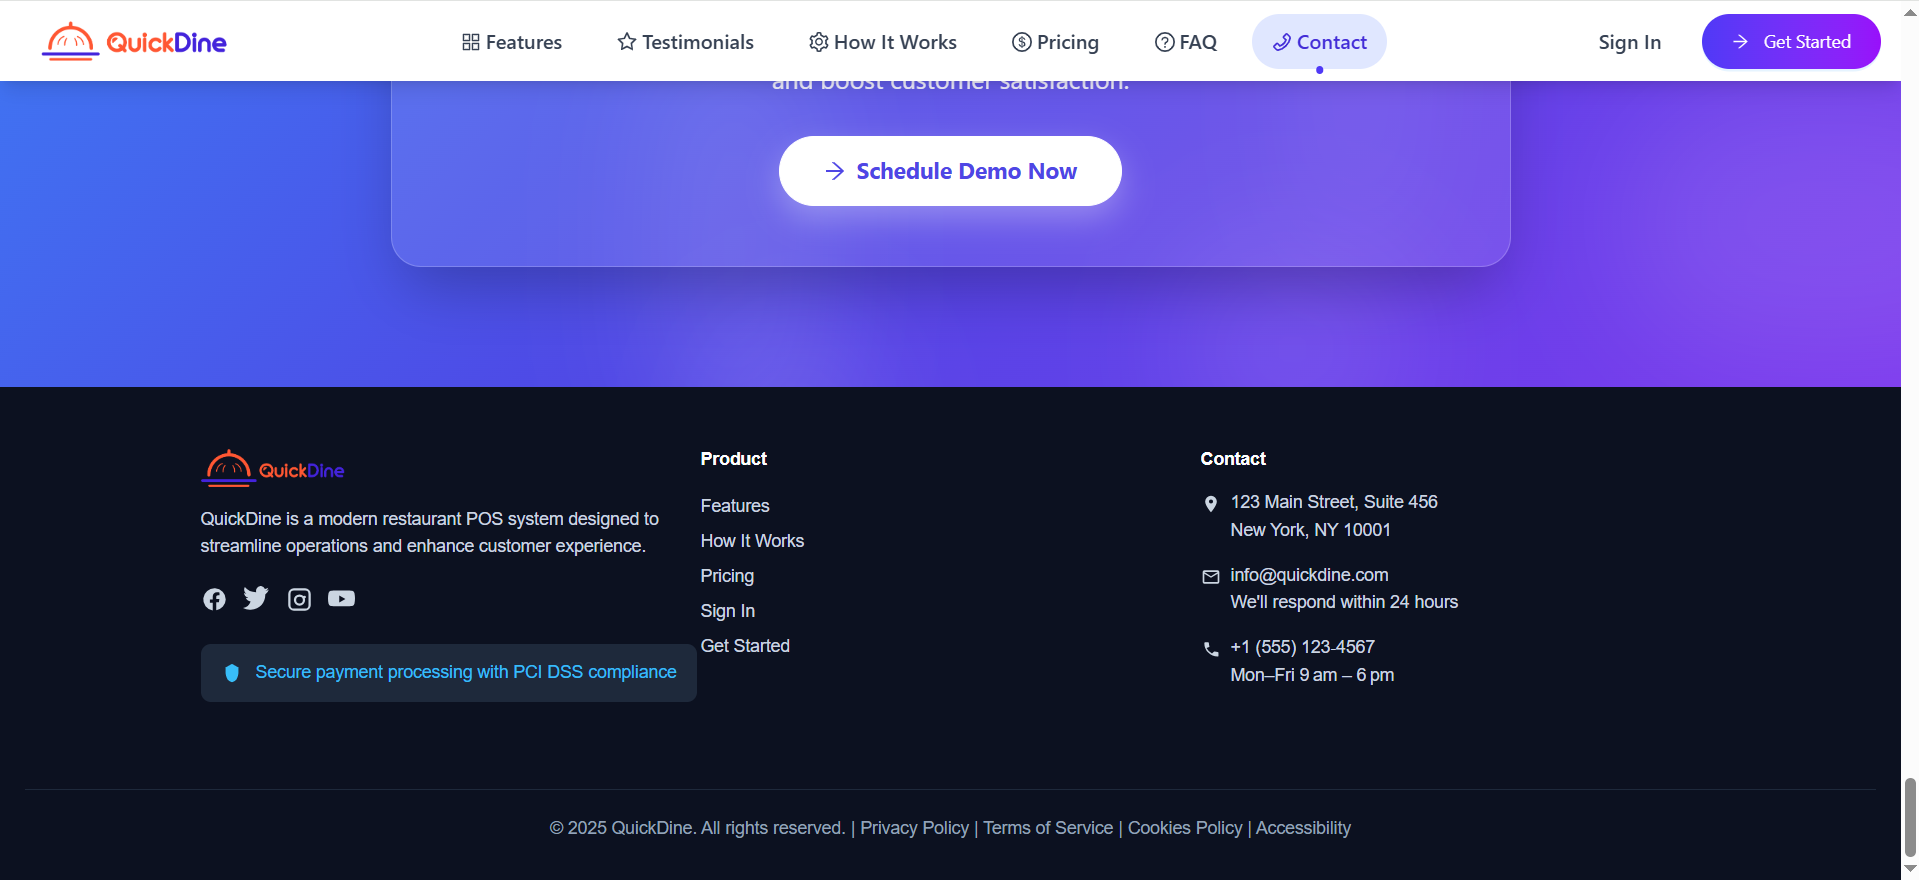
Footer Section Configuration Applied on Live section
Note: Make sure your footer includes all necessary legal links and information required by privacy regulations.
Login Page
The Login Page settings allow you to customize the appearance and content of the page where users sign in to your platform.

Login Page Configuration
- Feature titles
- Feature descriptions
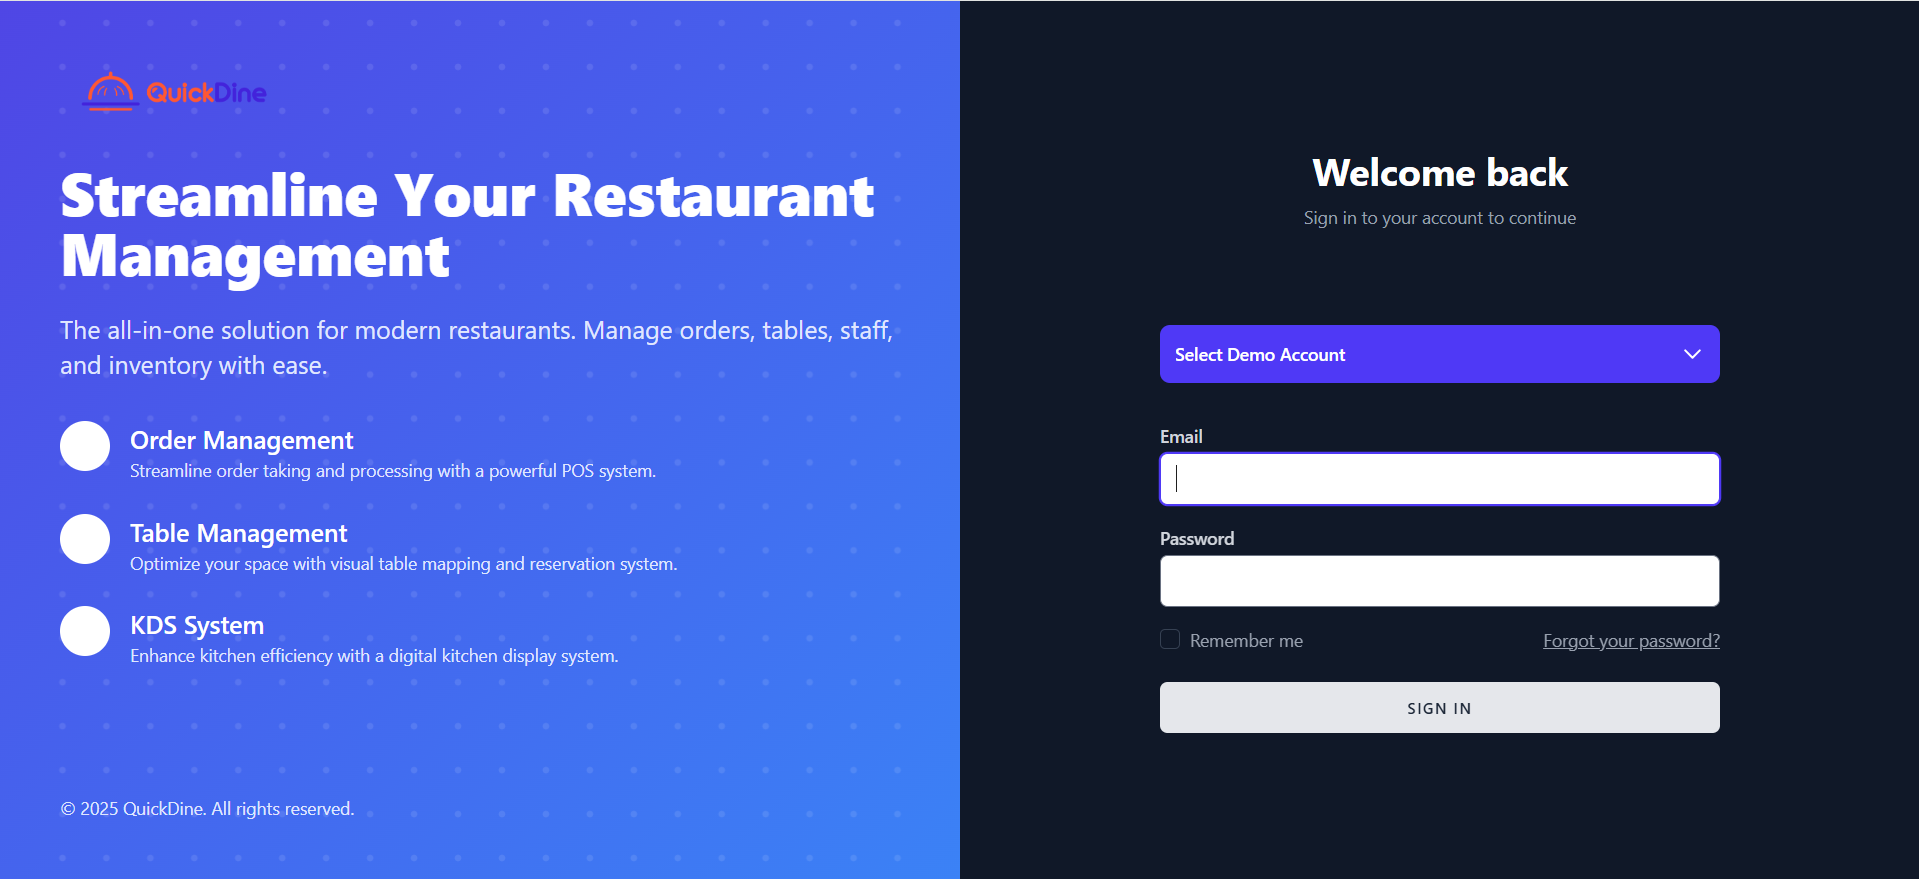
Login Page Configuration Applied on Live section
Ensure that your login page looks professional and consistent with your brand identity to build trust with users.